Improving my family's health .... using superior nutrition and toxin avoidance.
Friday, September 28, 2018
RECIPE: Easy Beef Stroganoff, gluten free
Saturday, September 22, 2018
RECIPE: Collards with Balsamic and Feta
A recipe from one of our farmers!!!
I haven't tried this yet, and don't have measurements (or a photo) because it was given to me in the farm store, but it sounds delicious and I wanted to get it posted ASAP so you can try it.
Remove the stalks and slice the leaves. Saute them with onions, garlic and some liquid (Shelley recommends chicken broth). Serve them drizzled with balsamic and feta cheese.
Friday, September 21, 2018
RECIPE: Melt-in-Your-Mouth Green Beans
1.5# green beans, trimmed and cut into 1" pieces
1 medium onion, minced
3 cloves garlic, thinly sliced
1/3 c. EVOO
1 large tomato, peeled, seeded, and the flesh grated
2 T. water
1/4 t. aleppo pepper (I prefer espelette)
salt
lemon juice
Combine everything except the lemon juice in a heavy bottom pot or slow cooker insert and stir to combine. Crumple a large square of parchment paper. Uncrumple it to the degree necessary to cover the beans with all edges inside the pot. (In the photo below, I used 6 bounds of beans.)
Cover the pot and cook on low for 5-7 hours, or medium low for 2-3 hours until beans are soft but not overcooked. Check every hour and stir to keep them moistened.
I don't have a slow cooker so I cooked mine in the oven for 12 hours as follows:
- 2 hours at 250 or until the beans are fragrant. Remove lid and parchment and stir every hour. Replace parchment and lid and return to oven.
- 8 hours at 200 (overnight). Remove lid and parchment and stir. Replace lid and parchment.
- 2 hours at 250 checking and stirring every hour until beans were soft.
Serve hot, warm, or at room temperature with a squeeze of lemon.
They are best when refrigerated overnight and then brought to room temp before serving.
Thursday, September 20, 2018
RECIPE: Creamy Kabocha Squash, Mushroom, and Noodle Bake
I used kabocha squash because that's what I had available but I know it will also work with butternut. If you use pumpkin, you will need to concentrate the puree because pumpkin has a lot more water in its flesh.
Yes, this recipe is a 'production' that requires 5 pots and pans; but, in my opinion, it's worth it and it comes together quickly. If necessary, you can cook the squash the day before. You can infuse the milk the day before, too, but will need to reheat it to make the sauce. If necessary, you can put the whole dish together and then bake it the next day if you bring to room temperature first and increase the baking time.
If you don't reduce the veal broth, you can serve the 'sauce' as a soup.
1 medium Sunshine kabocha squash (they're orange, not blue)
1/2 c. melted ghee, divided
2 c. milk
1/2 t. dry thyme
1 medium onion, chopped
1 bay leaf
a few sprigs parsley
3 whole cloves
2" stick cinnamon
1/8 t. nutmeg
1 bag frozen mushrooms, or 1.5 c. sliced mushrooms sauteed in ghee (1 c. cooked)
1/4 c. flour (I use sweet rice flour)
1 c. veal broth, reduced to 1/4 c. *
2 t. lemon juice
1/2 c. grated gruyere or parmesan cheese
1/4 t. cayenne
salt
1 pound noodles, any shape (I use penne or elbows)
2 T. ground walnuts
1/2 t. paprika
1. Preheat oven to 350 and line a baking pan with parchment-foil. Quarter the squash, remove the seeds, brush with 2 T. melted ghee, and bake skin side down at 350 for 30 min or until soft and lightly browned. Scrape flesh from skin and puree (I use a food processor; you can also use a blender or food mill). (If you have more than 1.25 c. puree, it makes a great 'pumpkin' martini!)
2. In a medium (2 qt) sauce pan, combine milk with onion, herbs and spices, and heat over med until it begins to simmer. Reduce heat and simmer for 30 minutes. Do not let it boil! If it does boil, it will instantly boil over so keep an eye on it! Remove spices and parsley. You can strain it to remove the onions but I like to leave them in. Season with salt.
3. Drain mushrooms reserving liquid.
4. In a large (4 qt) saucepan, melt 1/4 c. ghee on medium heat. Add flour and stir until mixture bubbles. Reduce heat to LOW and slowly add hot milk, stirring constantly to prevent lumps. It should thicken. if it doesn't, raise heat a little.
5. Add veal concentrate, lemon juice and liquid from mushrooms and stir until thickened.
6. Add 1.25 c. squash puree, mushrooms, cheese and cayenne and stir to combine.
7. Adjust salt. Sauce should no be too thick since noodles will absorb some of its moisture.
* If you do not reduce the veal broth, at this point you can serve the sauce as a soup!
8. Cook noodles in salted water until they're almost done. Remove 1/4 c. of cooking water, drain the noodles and mix them with sauce. Add the reserved 1/4 c. cooking water.
9. Pour into baking dish and sprinkle with walnuts and paprika. Brush with remaining 2 T. ghee.
10. Bake at 350 for 30 minutes until top is golden and edges are crispy.
Serve with bolognese sauce.
Monday, September 3, 2018
RECIPE: Canned Tomato Soup Base
I make the original recipe (with a few modifications) up to the point where she adds the cream, and then can it. After reheating, we add the cream.
3 T. ghee, tallow or lard
1.5 c. chopped red onions
2 carrots, chopped (I use 1 c. juicer pulp)
1 T. minced garlic
4 pounds vine-ripened tomatoes, coarsely chopped*
3 c. stock (I use chicken or veal)
1 T. salt
3/4 c. cream
Heat fat in a large heavy bottom pan over med heat and saute onions and carrots until very tender. Add garlic and saute 1 minutes. Add tomatoes, paste, stock and salt. Bring to a boil, reduce heat, and simmer until tomatoes are very tender, 30-40 minutes.
Put through a food mill, discarding the dry pulp, OR blitz in a blender for 3 minutes until smooth.
At this point, you can either stir in the cream and serve it; or, pressure can it. You MUST use THIS GUIDE to determine the pressure/time for your area. Yes, the link is for canning meat, and that is the correct one to use because of the fat and onions in the recipe. Do NOT use the pressure/time for canning tomatoes, and DO NOT WATER BATH CAN!!!!! (Seriously, you can die if you do!)
I use pint jars, leaving 1.5" headroom, then process for 75 minutes. One pint jar is a meal for one person when served alone, or for 2 people when served with a sandwich. If you use quart jars, leave 2" headroom and they must be processed for at least 90 minutes.
*If you prefer a chunky soup, you can peel and seed the tomatoes before cooking them and then skip the food mill/blender.
RECIPE: Yellow Pepper Salad Dressing with Black Garlic
ObisOne is aged organic raw garlic, with twice the antioxidants as fresh garlic and none of the garlic breath. It adds umami to savory dishes as well as a note of sweetness. It's wonderful with eggs (deviled or scrambled), mushrooms, and in cheese preparations. There are several recipes on the ObisOne website, and dozens on Google.
![]() |
| ObisOne black garlic |
Today, I used it to pump up some Yellow Pepper Dressing. It changed the color (in a negative way - brown again!) but it improved the flavor.
1/2 recipe yellow pepper dressing
6 cloves black garlic
After making a full recipe (that yields 4 cups of dressing), I poured half of it into a pint jar. To the amount remaining in the blander I added 6 cloves of black garlic and pulsed to combine.
I could have stopped when it was yellow dressing with black flecks (which looked great!) but the flavor permeates better when it's pureed.
It needs to sit overnight for the flavor to fully develop.
If you're adventuresome, you can make your own black garlic...
Saturday, September 1, 2018
RECIPE: Best Grilled Cheese Sandwich EVER!
We use a small convection toaster oven but you can use a regular oven if you don't have a small one.
For each sandwich:
2 pieces challah or rich sandwich bread cut 3/8" thick
Cheddar or Gruyere cheese, cut 1/8" - 1/4" thick, to cover the entire slice of bread*
1 hot pepper** sliced paper thin
2 T. ghee, melted.
Preheat a convection oven to 350.
Line a shallow baking pan with a Silpat mat (this prevents the cheese from sticking).
Brush 1 T. ghee on one slice of bread and put it on the Silpat mat ghee side down.
Place the cheese on the bread, covering the entire slice all the way to the edges
Place the hot pepper on the cheese, as much as you can tolerate!
Top with the second slice of cheese and brush the top with the remaining ghee.
Put the pan in the hot oven for 6-7 minutes until both sides are brown. If one side is browning faster than the other, CAREFULLY flip the sandwich. We don't normally have to flip them.
Cut in half with a serrated knife and serve!
* When we use Organic Valley Cheddar I can get 2.5 sandwiches out of one 'block'.
** You can use ham, bacon, tuna, tomatoes, or anything else you like in addition to, or instead of, the peppers. Cut them into small pieces to facilitate eating.
Sunday, August 26, 2018
RECIPE: Roasted Tomato Soup
Original Recipe: Tyler Florence Roasted Tomato Soup
The first time I made this soup it was late at night when the tomatoes came out of the oven and I was too tired to finish the recipe so I popped them back in the oven and left them there overnight. The next morning, they were beautifully caramelized and made the most amazing soup! It was also much easier doing all the prep on one day and finishing the soup the next.
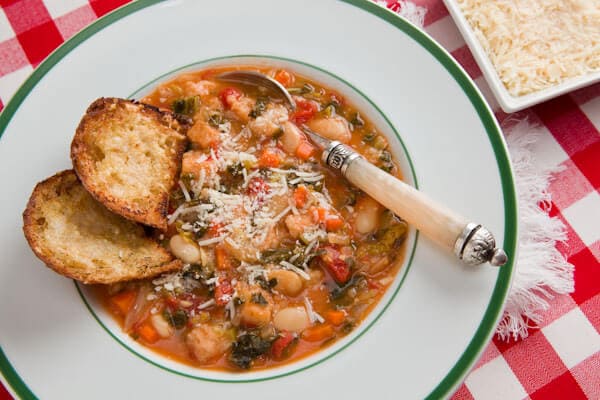
The soup is delicious with grilled cheese sandwiches.
Ingredients
2.5 pounds fresh tomatoes (regular, roma, or cherry or a combination)
6 cloves garlic peeled
1 medium onion or 1 large leek or a combination of the two, sliced
1/2 c. ghee, melted
Salt and pepper (I use cayenne)
1/4 c. demiglace*, OR 1/4 c roasted peppers, OR 2 T. balsamic, OR 1 T. pesto BE CREATIVE!
2 bay leaves or 1/4t. ground bay leaves
4 T. butter or ghee, softened
For serving:
1/4 c pistou (optional)
3/4 c. heavy cream (my husband prefers it plain, without cream or pistou)
Directions
Preheat oven to 450.
Wash the tomatoes, core them and slice in half. Spread the tomatoes, onions and garlic in a baking dish. Drizzle with 1/2 c. ghee and salt and pepper.
Roast for 30 minutes or until caramelized. Open oven door to release some of the heat, close it back up and leave the pan in the oven overnight.
![]() |
| before roasting and after caramelization |
Transfer everything** to a blender (yes, including the skins and seeds), add the demiglace, bay leaves, salt and pepper, and butter/ghee. Blend until smooth and creamy.
In my blender (a Blendtec) I press the "soup" button and, after 3 minutes of blending on high, the soup is smooth and warm enough to eat. If your isn't warm, heat it gently on the stove (it will sputter!).
**The tomatoes will exude a lot of liquid while they roast. The more of
this liquid you use, the thinner the soup will be. If you use it all,
you may need to blend it in two batches. If I plan to serve the soup immediately, I use all the liquid. If I'm going to store it, I have serious space
limitations so I don't use it all, which makes a thicker soup. When I
reheat it, I thin it with either milk, cream, broth, or water.
For Serving: LIGHTLY whip the cream until it just starts to thicken, stir in the pistou (don't stir too vigorously or it will turn to butter!) and drop several tablespoons onto each bowl of soup. You can stir it in if you prefer but I like the juxtaposition of the hot soup with the cold cream.
(I have also eaten the leftovers cold, sort of like gazpacho, sprinkled with basil chiffonade.)
* when I make this for vegetarians I use 2-4 T. roasted red peppers instead of demiglace.
(I've never tried roasting the peppers with the tomatoes because I always remove the skins and seeds from the peppers. If you try it, please LMK how it turns out!)
I have also made this without the demiglace, and without the additional butter, and using ghee instead of the additional butter, and it is fine both ways. It's richer with the additional butter/ghee, but if you're watching your calories it's still delicious without them. You shouldn't skimp on the ghee used when they're roasting, though.
Bulk Batch:
4 large onions, sliced 1/4" thick
35 medium tomatoes or 25 large ones
3-4 heads garlic
1 c. ghee
3/4 c demiglace (I've used both veal, chicken, and vegetarian - use whatever you have)
3 t. salt
3/4 c butter
1.5 t. jalapeno or cayenne powder
1.5 t. powdered bay leaf
Preheat oven to 450 (convection 425)
Arrange onion in large roasting pan
Core tomatoes and arrange them, cored-side down, over the onions
Put one garlic clove in each of the spaces between the tomatoes
Melt the ghee and spoon it over all making sure you get some on each tomato and garlic
Roast for 25 minutes.
Rotate the pan and roast for another 25 minutes.
Turn off the heat and leave in oven until cool.
In three equal batches, adding 1/4 c butter, 1/4 cup demiglace, 1 t. salt, 1/2 t. jalapeno and 1/2 t. bay leaf to each batch, puree in high-speed blender for 3 minutes until smooth.
I no longer can this - I had to leave too much headspace to get the jars to seal, and they took up too much space on my shelf. I now store the jars in the freezer.
Freeze, or transfer to quart canning jars and process 90 minutes at 10# pressure (use THIS GUIDE to adjust for your altitude. Yes, the link is for canning meat, and that is the correct one to use
because of the fat and onions in the recipe.)
Do NOT use the
pressure/time for canning tomatoes!.
Pressure can only!! DO NOT WATER-BATH CAN! (Seriously, you can die if you do!)
35 medium tomatoes made 7 quarts, each one filled with 600ml or 6 quarts filled with 800ml.
25 large tomatoes, pictured below, made 12 quarts!
The pan is a huge 18" x 12":
![]() |
| Onions, cored tomatoes, garlic before roasting. |
![]() |
| After roasting 1 hour, then resting in warm oven for 4 hours! |
Thursday, August 23, 2018
RECIPE: Ribolitta - Tuscan Kale and Bean Soup
Sally's photos of Sienna, and her description of the ubiquitous Ribolitta, are worth reading. You can follow her directions for cooking the beans from scratch if you're up for it. I use Eden Foods canned cannellini beans.
Ribolitta is usually made the day before and then reheated because the flavors improve overnight. It is also, usually, served over stale bread with the bread thickening the soup. I prefer to skip the bread so I make the soup fairly thick. If you eat the bread, add a little water.
This recipe makes a lot - 12 servings - so I can freeze some for later.
![]() |
| Sally Cameron's Ribolitta |
5-6 t. salt or to taste
Tuesday, August 21, 2018
RECIPE: Gluten-Free Aduki-Walnut "Meat" Balls
The original recipe is a great template for devising your own veggie burgers/meatballs. This is my first attempt and I must say they were delicious! I made them using the same seasoning as the veal meatballs and served them in the same asparagus-mushroom-cream sauce. No photo of the finished dish, though.
The photo below is from the second time I made them and they were just as good with marinara sauce. They really look like meatballs, don't they? They don't taste like meatballs, though, the texture is different. My husband, who's a big meat lover, enjoys these all the same.
This recipe is a template - scale it up depending on the number of people you want to feed
1 T. ghee
1 c. onions, minced
1 15oz can Eden Foods Aduki Beans, drained and rinsed*
1/2 c. walnuts, roasted (OR soaked, sprinkled with salt and new mexico chile, and dehydrated)
1 egg yolk + 2 T. water or milk
5 t. potato flakes OR 3 t. freshly ground psillium seeds
Seasoning mix:
1 t. basil
1 t. garlic powder
1 t. papria
1/4 t. cayenne
1 t. himalayan pink salt
OPT: 1 T. balsamic vinegar
Make a pomade with the egg yolks, water and potato flakes or psillium and set aside to re-hydrate. This is the 'glue' that will hold your ingredients together when they're cooked (bread is normally the 'glue' in meatballs with gluten).
On med-high, saute onions in ghee until translucent and lightly browned. Stir in seasoning mix.
Pulse walnuts in food processor until they're about 1/8" pieces. Don't grind them too small - the pieces will give your meatballs some 'toothiness'.
Add remaining ingredients, including onion mixture and pomade, and process to combine. Taste and adjust salt. Chill (I left mine overnight).
Form into 1.5" balls using a #60 melon ball disher.
In the big oven, I baked these at 350 for 20 minutes. Cut one in half and make sure they're cooked through.
In the small convection oven, where the heating coil is closer to the bottom of the pan, they burned in 15 minutes! The next batch I cooked on a higher rack at 325 for 15 minutes, and then turned off the heat and left them in the closed oven for another 15 minutes until they were cooked through.
*Aduki beans are an awesome sources of essential nutrients, vitamins and minerals!
I served these originally in an asparagus-mushroom-cream sauce. They were also good with spaghetti marinara. If you serve them this way, mix the spaghetti and marinara first and put the 'meat'balls on top. They are fragile and will break if you try to mix them in. Because they contain very little fat, you need quite a bit of sauce.


