Tuesday, December 29, 2020

RECIPE: Deconstructed Chicken Kiev-ish

I had planned to make Chicken Kiev for Christmas Eve dinner this year but ran out of time so I skipped the breading and deep frying and turned the filling into a sauce.  My husband was disappointed - he loves breaded deep fried food - but he appreciated that this version was much healthier, and he enjoyed it so much he had seconds!

This recipe is similar to the Chicken Meunière recipe I posted earlier.

Chicken Kiev-ish


serves 2

Ingredients

  • 2 chicken breasts (two halves, or one pair)
  • 2 T. rice flour (you can use wheat flour if you aren't avoiding gluten)
  • 2 T. ghee
  • 4 T. butter, room temperature
  • 4 small cloves garlic, peeled and thinly sliced
  • 1 t. salt
  • 2 T. minced Italian parsley
  • 2 T. minced fresh chives

Instructions

In a mortar and pestle, pound the garlic with the salt until it forms a paste.

Add the parsley and pound that to a paste.

Add the butter and pound it into the garlic and parsley.  Stir in the chopped chives and mix well.  Set aside.

If the breasts are very thick, cut the thick portion in half horizontally creating two thinner slabs. I also remove the tendon that runs down one side.  Gently pound each slab between two sheets of parchment to 1/4" thick*.  Season them with salt and pepper, then dredge them lightly with the rice flour.

In a frying pan large enough to hold both breasts, heat 2 T. ghee on medium-high.  Add the breasts and fry, turning once, until lightly browned on both sides and juices run clear when pricked with a fork (timing will depend on how thin your cutlets are).  

Remove to a warm plate and tent with parchment while you prepare the sauce.

Reduce heat to medium, add the butter mixture to the pan and stir until it melts and the garlic warms enough to take the raw taste away, 1-2 minutes. 

Pour the sauce over the breasts and serve them immediately.

I served them with mashed celeriac (seasoned with brown butter rather than garlic and thyme), and roasted vegetables (broccoli, cauliflower, and asparagus).   I prepared the sides first and kept them warm while I prepared the chicken because the chicken comes together so quickly.

*I have read that the giant chicken breasts sold these days have long fibers that separate when you pound them, and I noticed that parts of my breasts DID fall apart, which would have made it impossible to make traditional chicken kiev anyway.  By cutting the thick part of the breast in half horizontally into thinner slabs, the pieces should cook evenly even without pounding.


Saturday, December 26, 2020

RECIPE: Curried Lamb with Turnips and Arugula

There isn't much in the farm store these days, so I've been looking for creative ways to use turnips, cabbage, and carrots.  I pulled out my Indian cookbooks to see if any of them had a turnip recipe and found this one!  It was a bit more work than I wanted to do, so I simplified it.  It was so good, I made again a week later!  

This is a Kashmiri dish and the seasoning was unusual for me - it included fennel powder which I don't often see in a curry recipe.

The first time I made this, I had a small amount of arugula languishing in the fridge and I was craving something green so I chopped it up and added it to my bowl.  My husband saw what I did and wanted some, too!  We liked it so much I add arugula ever time I make this now even though it wasn't part of the original recipe. You could use baby spinach instead.

I have made this with beef instead of lamb and the seasoning works with both proteins.  My husband prefers lamb because it's tenderer (is that a word?).  

Original recipe is from Great Curries of India by Camellia Panjabi

Curried Lamb with Turnips (and arugula) 


Serves 4

The original recipe calls for salting the turnips to remove some of the bitterness, but I've found that if you use large turnips they are naturally sweeter and you can skip this step.  

She included instructions for making a quick lamb broth seasoned with garlic and bay, but I had some traditionally-seasoned lamb broth from the last time I bought half a lamb, and used that instead.  You can can get away with using water in a pinch but the flavor won't be as complex.  

The other change I made was to use black cardamom seeds rather than the pods, because I didn't have any pods, and I really liked the occasional burst of flavor when I bit into a seed.  I wish I had replaced the green cardamom pods, too, because biting into one of them was unpleasant.

Ingredients

  • 11oz small turnips (larger turnips will be sweeter), cut into 3/4" cubes or slices
  • 2 medium onions, chopped
  • 2 garlic cloves, minced
  • 1.5" fresh ginger, peeled and minced
  • 1.5 pounds stewing lamb
  • 1.5 medium tomatoes, peeled, halved and grated, or 1/4 c. tomato puree, or 1 T. tomato paste
  • 2 c. lamb broth or water
  • 5 T. ghee
SPICE MIXTURE:
  • 1 t. cayenne pepper
  • 1.5 t. paprika powder
  • 1 t. turmeric powder
  • 3/4 t. fennel powder
  • 1.5 t. coriander powder
  • 2 black cardamoms (OR 1/4 t. cardamom seeds, OR 1/4 t. ground cardamom)
  • 4 green cardamoms (OR 1/2 t. cardamom seeds, OR 1/2 t. ground cardamom)
  • 1.5" cinnamon stick
  • 1 bay leaf
 OPT: one 5oz container baby arugula or baby spinach cut into 1" pieces 

Instructions

In a frying pan, heat 3 T. ghee and fry the turnips for about 20 minutes until they're pale gold and begin to get a crispy skin.  Remove to a plate.  (If you want, you can skip this step and add the turnips to the pan when you add the tomato and stock but they will not hold their shape as well once they're cooked - the crispy skin holds them together!)

Add 1 T. oil and saute the chopped onions for 20-25 minutes over low to moderate heat until uniformly golden brown.  If the heat is too high, they will brown unevenly.

Add the minced garlic and ginger and saute for 5 minutes.

Add the remaining 1 T. oil, all the spices, the lamb and 2 T. water and saute for 2-3 minutes.  Cover and simmer for 10 minutes until the lamb releases moisture which is then reabsorbed.    

Remove the lid when the meat is almost dry.  With a cooking spoon, stir and turn the meat for 5 minutes.  Continuous stirring allows the spices to come in contact with the heat at the bottom of the pot and develop their flavor.  This is known as the bhuna process.

Season with 2 t. salt, add the tomato, and stir in the stock.  Cover and simmer for about 30 minutes.

Five minutes before the meat is tender, add the reserved turnips.

When both the meat and turnips are tender, taste for seasoning and add salt if necessary.  Turn off the heat, stir in the arugula and serve.  The turnips will absorb some of the liquid as they sit so add more water as required.


Friday, December 25, 2020

RECIPE: Chicken Meunière

The first time I ever had 'meunière' was in a tiny restaurant on a back street in Rio de Janiero where they prepared freshly caught sole fillets table-side with their version of 'meunière' sauce.  It was out of this world!  I don't prepare fish very often - it's hard to find fresh and I'm afraid of depleting our oceans - so I devised this recipe to use the same seasoning with chicken breasts.

Chicken Meunière


Serves 2

Ingredients

  • 2 chicken breasts (two halves, or one pair)
  • 2 T. rice flour
  • 6 T. butter
  • 1 medium organic lemon (or lime)
  • 2 T. minced Italian parsley
  • 2 T. salted capers, rinsed

Instructions

Scrub the lemon, remove the zest, and then juice the lemon reserving both the juice and the zest. 

If the breasts are very thick, cut the thick portion in half horizontally creating two thinner slabs. Gently pound each slab between two sheets of parchment to 1/4" thick.  Season them with salt and pepper, then dredge them lightly with the rice flour.

In a frying pan large enough to hold both breasts, heat 4 T. butter on medium-high.  Add the breasts and fry, turning once, until lightly browned on both sides and juices run clear when pricked with a fork (timing will depend on how thin your cutlets are).  

Remove to a warm plate and tent with parchment while you prepare the sauce.

Add the remaining 2 T. butter to the pan and cook until golden, 1-2 minutes.  Remove pan from heat.

Add the lemon zest and juice to the pan (it will sputter), and stir in the parsley and capers.  

Pour the sauce over the breasts and serve them immediately.

I served them with sauteed escarole and hearts of palm noodles.  The escarole was delicious!  The hearts of palm noodles were awful!   I prepared the sides first and kept them warm while I prepared the chicken because the chicken comes together so quickly.


Wednesday, November 4, 2020

RECIPE: GF Bacon and Onion Mac and Cheese (with optional butternut)

Waiting for the election returns to be finalized, we needed comfort food, so I pulled this together with stuff I had in the fridge.  

If you love BACON, you will LOVE this!  The bacon is served on top, so it's still crisp, and the bacon fat is used to create the white sauce for the pasta.  I sauteed onions in the fat before making the roux, which added umami to the sauce.  I debated whether to stir the onions in, but decided to serve them on top, too.  A few leftover green peppers from yesterday's fried rice cut through the richness and added some color.

The cheese I used was white, not orange, so I added some sunshine kabocha to the sauce.  You can use any orange-flesh winter squash for this - pumpkin, butternut, kabocha, etc...  It will add richness, color, and nutrition without changing the flavor.

GF Bacon and Onion Mac and Cheese


serves 4-6

INGREDIENTS

  • 1 pound macaroni (I used Tres Omega gluten free elbows)
  • 1 pound bacon
  • 1.5 cups diced onions
  • 1/4 c. minced green peppers
  • 1/3 - 1/2 c. flour (I used gluten free sweet rice flour)
  • 4 cups milk (I used whole milk) 
  • 1/2 t. dried thyme leaves
  • 4 cloves garlic, minced
  • 4 cups of shredded cheese (I used a combination of raclette and cheddar)
  • 1 cup fresh ricotta
  • 1 c. winter squash puree (I used sunshine kabocha)
  • 1/4 t. cayenne, or to taste
  • 1 t. salt, or to taste 

INSTRUCTIONS

Cook the pasta according to package directions, for 1 minute less than recommended, so it's a little underdone.  Drain and return to the warm pan.  Cover and set aside.

In a small sauce pan, combine the milk with the thyme and garlic.   Warm it over very low heat until small bubbles appear around the edge.  Do not let it boil.  Keep it warm while you prepare the other components.

In a medium sauce pan, cook the bacon on medium heat until it's light brown and crisp.  Remove to paper towels.  

Add the diced onions to the hot bacon fat and saute on medium until light brown on the edges.  Remove to a bowl leaving as much fat behind as possible..

Make the roux:  Depending on how much fat is left in the pan*, add enough flour to make a thin paste and, stirring constantly, saute it until it's light brown.  (*If your bacon is very fatty, you should measure out 1/3 cup of grease and reserve the rest for another use.) 

Make the sauce: Turn the heat off.  Add the warm milk to the pan 1/2 cup at a time, and stir vigorously after each addition to insure no lumps form.  If there are lumps, use an immersion blender to smooth out the sauce.

Return the sauce to medium low heat and stir until it's warm, thick and creamy.  

Add the cheeses and stir until they've melted.  Add the cayenne.  If you're using it, add the winter squash puree.  Stir well.

Taste the sauce and adjust the salt.  I added 1 teaspoon because the cheese and bacon we use isn't overly salty.

Add the sauce to the reserved pasta. You may not need it all.  I added it one-cup at a time and had a LOT of sauce left over.  I suspect it's because I used GF pasta which doesn't expand as much as wheat pasta does. 

Serve immediately with the reserved bacon, onions, and green peppers sprinkled on top.

If you want to bother, you could mix everything except the bacon together, transfer it to a baking dish,   sprinkle with grated parmesan, and then bake it in a 350 oven until the top browns.  I'll do that tomorrow with the leftovers.  

If you stir the bacon in, it will lose its crispness. 

This was wonderful with Gruner Veltliner, the dry white wine we usually serve with raclette.


Thursday, October 8, 2020

RECIPE: Jule's Sauteed Greens

This is a no-recipe recipe given to me by one of our apprentices, Jule Jacobs!  Use whatever quantities you need to serve your family's tastes: If you can tolerate heat, use more pepper flakes; if you can't, leave them out.  If you love spinach but aren't sure about kale or pac choi, use more spinach.  If you love them all, use equal amounts. 


Jule's Sauteed Greens

  • ghee, butter, or EVOO
  • garlic
  • onions, chopped
  • pepper flakes
  • whatever herbs you have available (there is dill, cilantro and parsley in the farm today)
  • coconut aminos
  • spinach, washed and sliced into 1/2" ribbons
  • kale, washed and sliced into 1/2" ribbons
  • pac choi or bok choy, washed and leaves sliced into1/2" thick ribbons


Add the fat, pepper flakes and garlic to a cold saute pan and slowly bring the heat to medium.  When the fat is hot, add the onions and saute until soft.

Add greens, herbs, and coconut aminos.  Cover the pan, leaving the lid a little ajar, and saute until the greens are bright green.  If you're using kale, you'll need to cook it for an additional 2-3 minutes until soft but not soggy.  If you cook longer than 7 minutes, they'll turn brown so don't overdo it!

Season with salt and serve!

Monday, October 5, 2020

RECIPE: Creamed Spinach

There is spinach in the farm store! 

I have been making this recipe - the original one WITH the bacon - for years!  I've adapted it to avoid unhealthy ingredients (like granulated chicken base, which is full of MSG!).

Original Recipe: Berghoff's Creamed Spinach

GF Creamed Spinach


serves 6

  • 4 tablespoons bacon fat (from 6 slices bacon - reserve cooked bacon for another use)
  • 2 large leeks, white and light green parts, minced
  • 3 T. flour (I use sweet rice flour)
  • 2 c. whole milk, warmed*
  • 2 T. veal demiglace (or, 1 cup chicken broth reduced to 2 T.)
  • 1.5 t. salt
  • 1/2 t. freshly grated nutmeg
  • 10 ounces chopped cooked spinach (fresh or frozen) squeezed of as much liquid as possible (measure after squeez1ng out the liquid)

Warm the milk.  *I used 2 cups in the photo above.  If you use less, like 1 cup, you'll have a much denser and greener dish.  I made with only 1 cup for our apprentices and I think it tasted better with less sauce.  

Melt the bacon fat over medium heat and saute the leek until tender, 5 minutes.

Stir in the flour and cook 2 minutes, stirring constantly.

Remove the pan from the heat and add the milk all at once, then whisk vigorously to prevent lumps.  If you get lumps, you'll need to use an immersion blender to smooth out the sauce.  Doing this will also puree the onions, but that's better than having lumps in your sauce!

Return the pan to medium-low heat and cook, stirring constantly, until the mixture thickens, about 5 minutes.  If it doesn't thicken, raise the heat slightly.

Add the demiglace, salt and nutmeg.

Add the spinach and cook until it absorbs some of the sauce, about 5 minutes.  Don't cook it too long or it will lose its bright green color!  Taste and adjust seasoning.

Serve immediately.

In the photo above I served it with spicy chicken tenders.  For our apprentices, I served it with Cajun Meatloaf.


Sunday, August 2, 2020

RECIPE: Austrian Veal Goulash


This is my mother's recipe for Veal Goulash.  She was Austrian.   

When I researched the seasoning to determine whether it was unique, I discovered that it goes back hundreds of years, to the Romany.  I found recipes with similar seasoning for chicken goulash, beef goulash and vegetable goulash! 

What I didn't find were recipes for veal goulash, which is what my mother always used.   The meat:onion ratio should be no less than 1:1.  In other words, 1 pound of onions for every pound of veal.

Austrian Veal Goulash
Serves 4

Ingredients
  • 4 t. marjoram
  • 2 t. ground caraway seed
  • 2 t. lemon zest
  • 2 cloves garlic, minced
  • 1/4 cup beef tallow
  • 1 pound yellow onions, thinly sliced
  • 2 t. tomato paste
  • 4 T. paprika
  • OPT: 1/2 t. cayenne
  • 1 pound veal stew meat
  • 4 cups veal broth

Crush together the marjoram, caraway, lemon zest, and garlic.  I used a mortar and pestle for this.

Heat a large skillet over medium-high. Add the tallow, then add the onions and the lemon-garlic-spice mixture and saute until soft and lightly browned.  Push the veggies to the side of the pan (or remove them to a bowl), add the veal and saute until it's well browned, 10-12 minutes.  Stir in the onions and season with salt.

Add the tomato paste and the paprika and saute 4-5 minutes.

Add the broth and simmer, covered, until the veal is tender, about 2 hours.  Stir occasionally to prevent sticking.

Serve with rice or noodles, and Austrian Cucumber Salad!


Friday, July 31, 2020

RECIPE: Chickpea and Fresh Herb Fatteh

This recipe is perfect for when the farm store is full of fresh herbs!

It's a lot of work, but it doesn't take long (if you exclude the time it takes to soak the chickpeas) and it's irresistibly good!  I serve it with the pita chips on the side, and with Spicy Baked Chicken Tenders  using za'atar instead of BBQ spices. 

Original Recipe: How to turn bread into a great meal

Chickpea and Fresh Herb Fatteh 
with optional Spicy Chicken Tenders
Serves 4-6

For the Salad
  • 12oz dried chickpeas (or two 29oz cans, drained, and skip to step 3.)
  • 2.5 t. baking soda
  • 1 round pita (about 3.5oz), pocket opened, and roughly torn into 1-inch pieces (or 4 gluten free tortillas, whole).
  • 5 T. EVOO
  • 1 T. Za'atar
  • 3/4 c. packed roughly chopped fresh cilantro leaves and tender stems
  • 3/4 c. packed roughly chopped fresh parsley leaves and tender stems
  • 2/3 c. roughly chopped fresh chives
  • 2.5 T. fresh lemon juice
  • 2 garlic cloves, crushed in a garlic press
  • 1 t. cumin seeds, toasted, then roughly crushed
For the Tahini Sauce
  • 1/3 c. tahini
  • 1.5 T. fresh lemon juice
  • 1 garlic clove, crushed in a garlic press
  • 1/4 t. salt
  • 1/4 - 1/2c water
For the Chile Oil
  • 2.5 T. EVOO
  • 2 t. red pepper flakes
  • 1 t. sweet paprika

Himalayan pink salt and pepper


1. Place the dried chickpeas and 1.5 t. baking soda in a large bowl.  Top with enough cold water to cover by about 3cm, and let soak at room temperature for at least 8 hours or up to overnight.

2. Drain the chickpeas well and add them to a large saucepan along wit the remaining 1 t. baking soda.  Add 1.5 quarts (6 cups) water.  Brink to a simmer over medium-high heat, then lower the heat to medium and let cook until chickpeas are soft but retain a slight bite, 30-3 minutes.

3. Heat the oven to 375F.

4. (If you're using canned chickpeas, add them to a large saucepan with 4 cups water and bring to simmer over medium heat.) Add 1.25t. of the salt and continue cooking until the chickpeas are super tender, 5-10 minutes more.  Use a slotted spoon to set aside 1/2 c. strained cooked chickpeas.  Keep the rest warm on low heat until ready to serve.

5. While the chickpeas are cooking, prepare the toppings:  Spread 1 t. oil on a large baking sheet and then line it with parchment.  The oil will keep the parchment 'stuck' to the pan.  Toss the pita with 2 T. oil, za'atar, 1/4 t. salt, and a good grind of pepper, and spread out on the parchment-lined baking sheet.  Bake until golden and crisp, tossing halfway through, about 12 minutes.  Set aside.

NOTE: If you're using gluten-free tortillas, lay 6 of them on the parchment, rub 1/4 t. oil on each one and sprinkle with za'atar, salt and pepper.  Bake for 8 minutes, rotate pan and bake an additional 2-4 minutes.  Break them over the dish when you're ready to serve it.


6. Make the tahini sauce: In a medium bowl, whisk the tahini, lemon juice and garlic with 1/4 - 1/2 c. water and 1/4 t. salt until smooth and pourable.  Depending on the brand of tahini you use you may need more or less water so add it 1-2 T at a time.  The tahini sauce will thicken as it sits.


7. Make the chili oil: Add the oil and red pepper flakes to a small frying pan.  Heat over medium until gently bubbling and fragrant, about 4 minutes., then add the paprika and remove from the heat.  Set aside.


8. When ready to serve, add the reserved chickpeas to a food processor along with the fresh herbs, 2.5T. lemon juice, the garlic, cumin, 1/4 t. salt, a good grind of pepper, and the remaining 3 T. EVOO.  Blitz until smooth, then transfer to a large mixing bowl.

9. Drain the warm chickpeas using a sieve set over a bowl.  Add the chickpeas and 3/4 c. of their liquid to the herb mixture , mixing well to combine.  You want the chickpeas to be well coated and the whole mixture to be saucy but not overly wet. Add a couple more tablespoons of chickpea liquid if necessary, and discard the remaining.

10. Transfer to a large platter with a lip.  Drizzle lightly with some of the tahini sauce, then all of the chili oil.  Sprinkle half of the pita and serve warm, with the extra tahini and toasted pita alongside.


Sunday, July 26, 2020

RECIPE: Toby's Chocolate Maple Syrup

As you may have noticed, I don't make many desserts.  I PLAN to - I save recipes for them all the time - but I never get around to actually making them.  When we entertain, I will SOMETIMES pull something together, usually chocolate mousse which is easy and can be made ahead; but, more often than not, when our guests ask whether they can contribute something to the meal I ask them to bring dessert.  Usually, they bring ice cream, which is my husband's FAVORITE dessert.

Last month, he bought an ice cream maker.  We made one batch of vanilla to test the machine and he liked it so I guess we're keeping it.  It's the kind where you store the bowl in the freezer.  I think it's a pain, partially because it takes up a LOT of room in our already filled-to-the-brim freezer, and partially because when you decide you want to make ice cream you have to chill the mixture 1-2 hours before churning it, so you really have to plan ahead, something I'm not very good at.

ANYWAY...a few weeks ago one of the farm apprentices gave us some homemade strawberry jam made with maple syrup (isn't that a great idea?!?).  I thought it would be delicious over ice cream drizzled with chocolate sauce, and so did my husband, so tonight we made that happen.

While he made the ice cream, I whipped up this quick and easy chocolate syrup.  The recipe was given to me by my friend, Toby.

Toby's Chocolate Maple Syrup
Makes about 1/2 cup

Ingredients
  • 2 T. cacao powder
  • 1/3 cup maple syrup, more or less

In a small bowl mix the cacao powder with 1-2 TEASPOONS of maple syrup until you have a lump-free paste.  I used a small spatula and pressed the lumps against the side of the bowl to break them up.

Gradually add in the remainder of the maple syrup.  TASTE as you go!  Depending on the bitterness of  your cacao and the sweetness of your maple syrup, you may need either more or less of the maple syrup.  The goal is just enough to cut the bitterness of the cacao but no so much that the chocolate flavor is obliterated.

You can eat it cold, but I prefer it warm.  Heat in a small saucepan over very low heat until just warm.

To make a sundae, fill a small bowl with ice cream, dollop fruit jam on top, and drizzle with the warm syrup.  Yum!!

If there are any leftovers, store them in the refrigerator.


Saturday, July 25, 2020

RECIPE: German Carrot Salad with Honey and Dill

I love cooked carrots, but my husband doesn't.  He loves raw carrots, so I look for unusual ways to prepare them.  This recipe is super easy and uses the dill that was in the farm store last week.  I really like the recipe, but my husband isn't crazy about it.  Go figure.

My recipe is a combination of several I've seen online.

German Carrot Salad with Honey and Dill

Serves 2 - 4

Ingredients
  • 1 T. olive oil
  • 1 T. apple cider vinegar
  • 1 T. honey
  • 1 T. fresh dill, minced
  • 1/2 t. himalayan pink salt
  • 4 cups grated carrots

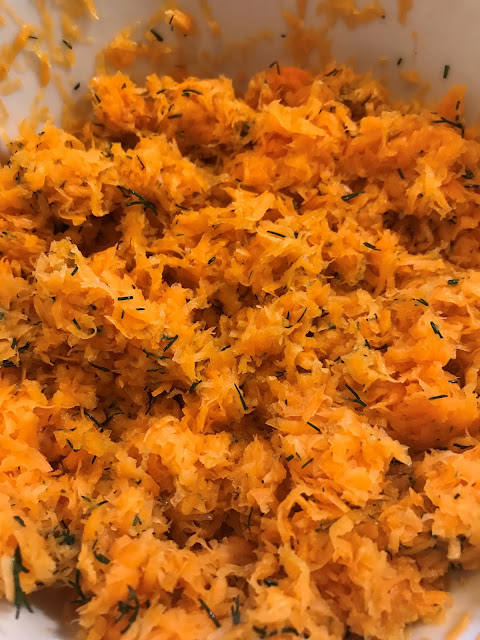
I grated the carrots on a fine microplane grater, which made the pieces very small and thin.  I LOVED the texture but I suspect that's why my husband wasn't thrilled with it - it didn't have the substance a larger grate would have. 

If you grate the carrots finely, they will be 'fluffy,' and one cup will mush down to 2 cups when you add the dressing.  If you grate them coarsely, 4 cups will not mush down and will feed 4 people.

fluffy finely grated carrots!

In a medium bowl, whisk everything except the carrots.

Add the carrots and toss gently to combine.

If you grate the carrots finely, you can serve this right way, but it's better a few hours later when the flavors have had time to meld. 


RECIPE: Austrian Cucumber Salad with Sour Cream and Dill

There are a dozen versions of this recipe online, all of them similar to this one, and ALL of the comments include at least one person claiming that their grandmother salted the cucumbers before mixing them with the sour cream.  One person claimed that her mother placed the cucumbers in a colander, salted them and then covered them with ice cubes.  Once the ice cubes melted, the cucumbers were ready to use. 

Feel free to do that, if you prefer, but I never do.

Cucumber Salad with Sour Cream and Dill
(aka gurkensalat)
Serves 4

Ingredients
  • 1/3 cup sour cream
  • 1/2 t. Dijon mustard
  • 1 T. apple cider vinegar
  • 1 T. milk or water
  • 1/2 t. himalayan pink salt
  • 2 T. fresh dill, minced
  • 3 small cucumbers or 1 English cucumber washed
  • 1/2 c. red onion, sliced paper thin

In a medium bowl, whisk together everything except the cucumbers and onions.

Slice the cucumbers about 1/16" thick.  I've read that the Austrians slice the cucumbers thicker than the German's, who slice them paper thin.  As you can see in the photo below, mine are not paper thin.


Add the sliced cucumbers and onions to the sour cream mixture, then toss gently to combine.

Cover and refrigerate at least 1 hour before serving.  The cucumbers and onions will soften and release some of their juices into the dressing, which makes the cucumbers crisp and the dressing a little looser.


Tuesday, July 21, 2020

RECIPE: Creamy Balsamic Dressing

There is so much beautiful lettuce in the farm store at this time of year that I've been looking for interesting dressing to serve it with.  This one is a little better than merely mixing balsamic and olive oil.  I changed the preparation slightly.


Creamy Balsamic Dressing
Makes 1 1/4 cup

2 T. honey
1 t. Dijon mustard
1 garlic clove, grated*
1 t. himalayan pink salt
1/4 t. cayenne
1/4 c. balsamic vinegar
3/4 c. olive oil

*If you don't want to grate the garlic clove, you can puree it in a mortar and pestle with the salt.

Combine the honey, mustard, garlic, salt, cayenne and vinegar in a pint jar and mix well.

Pour the olive oil into the jar and let it rest 2-3 minutes to rise to the surface. 

Insert an immersion blender to the bottom of the jar and turn it on.  Allow the blender to gradually draw the oil in until it's emulsified.  It should take about 10 seconds.  Don't over-blend or you will damage the oil.


Cover and store n the refrigerator, but know that it will solidify and you will need to give it time to come to room temperature before you use it. 


The salad shown below was delicious!  Arugula, sun dried cherry tomatoes, thinly sliced scallions, and this dressing! 


RECIPE: "Sun" Oven Dried Cherry Tomatoes, Yellow and Red

The farm's cherry tomatoes are starting to ripen, so now is a good time to share this recipe.

I have been unable to find sun dried tomatoes using healthy ingredients (organic EVOO and sea salt),  so I decided to make my own.  I use the cherry tomatoes our farm grows because the paste tomatoes are usually too large.  Cherry tomatoes, on the other hand, don't need to be chopped before use because they're already bite size!

They can be made in an oven or a dehydrator.   


I have a friend who doesn't  like tomato seeds so I tried making these once without the pulp and they ended up being nothing but a crunchy shell.  You need the pulp to create bulk.

(This is the recipe I started with, but she uses roma/plum tomatoes: Oven Dried Tomatoes in Olive Oil)


"Sun" Oven Dried Cherry Tomatoes
Makes as much as you have tomatoes


Ingredients
  • Cherry tomatoes - red, yellow, or grape*
  • Salt

Instructions

Cut each tomato in half and arrange on a baking sheet or dehydrator tray.  Sprinkle with salt.

If you're using an oven, roast at the lowest temperature your oven will allow, turning the pans occasionally, until the tomatoes are leathery.  If you take them beyond this point, all the way to crunchy, they will make a delicious snack (tomato chips!) but you will not be able to rehydrate them, ever.


Dehydrator trays - notice how green the orange tomatoes are

If you're using a dehydrator, they need 2-3 days at 135F to reach the leathery stage.  As above, if you take them beyond this point, all the way to crunchy, they will make a delicious snack (tomato chips!) but you will not be able to rehydrate them.

By 'leathery' I mean that the moisture has left but they are still pliable.  They will shrink a LOT!


Oven tray before and after

I have made them both ways (oven and dehydrator) and oven is definitely faster but you have to be vigilant because they go from leather to crisp very fast.  In the photo above, some of them are a bit too dark and crunchy!  I prefer the dehydrator.

At this point, they can be frozen or stored in EVOO (in your refrigerator).

When I use them, I don't rehydrate them, I just toss them into whatever I'm making.


* I pick the tomatoes when they're still a bit green inside as they survive the trip home much better.  I then let them ripen at room temperature.  For drying, I actually prefer them when they're green because I like the sour pop they provide when I add them to a dish. The fully ripe ones are sweeter, so I generally make both.


I used them in the salad shown below.  Arugula salad with sun dried cherry tomatoes and thinly sliced scallions with creamy balsamic dressing.


Monday, July 20, 2020

RECIPE: KFC Copycat Coleslaw using Chinese Cabbage

There was cabbage in the farm store today!! 

I have to admit that I've never had KFC coleslaw ( gave up fast food decades ago!).  However, when I researched recipes for coleslaw, this one seemed to be the flavor-profile I was after and it IS delicious, whether it's just like KFC's version or not.  It's good right after you mix it, but it's better the next day.

The cabbage in the farm store today was Chinese, which isn't typically used to make coleslaw, but it's what I had so I used it.

Original Recipe: KFC Coleslaw Recipe

KFC Copycat Coleslaw
Makes 1/2 gallon

8 cups finely diced cabbage (about 1 head)
1/4 c diced carrot (about 1 carrot)
2 T. minced yellow onions (I used scallions)
1/4 c. sugar (do not use sucanat)
1/2 t. salt
1/8 t. pepper
1/4 c. milk
1/2 c. mayonnaise
1/4 c. buttermilk
1 1/2 T. apple cider vinegar
2 1/2 T. lemon juice

Combine cabbage, carrots and onions in a large bowl and mix well.

Combine remaining ingredients in a small bowl and mix well.  Pour over vegetables and mix thoroughly.

Cover and refrigerate several hours, or overnight. 


Friday, July 17, 2020

RECIPE: Pressure Cooker Lamb Curry

I found this recipe online and was surprised at how good it was!  The lamb I used was from a local farm and, although it was labeled "stew meat," it had BONES!  After 20 minutes in the pressure cooker, the meat was so tender it was falling off them. 

I don't have an Instant Pot so I adjusted the recipe to use a pressure cooker.  Ours is a Fissler Vitaquick, and I LOVE it!  Mine came with a 4-quart pot and an 8-quart pot, one pressure cooker lid, and one glass lid.  The pots nest so I'm able to store all 4 pieces in the space of one pot. 

For this recipe I used the 4-quart pot and it was perfect. 


Pressure Cooker Lamb Curry
Serves 4

  • 1 pound lamb leg steak, cut into 1 inch pieces
  • 1 T. ghee
  • 1 medium onions, chopped
  • 1" ginger, grated
  • 6 cloves garlic, grated
  • 2 T. tomato paste
  • 1/2 c. coconut milk    
  • 3/4 cup water, divided
  • 1 t. salt
  • 3 t. garam masala
  • 1/2 t. turmeric powder
  • 1/4 t. cayenne powder
  • 1 t. paprika
  • 1/2 t. ground cardamom
  • Garnish:
  • 2 T. cilantro leaves
  • 1/2 t lime juice

In the bottom of your pressure cooker, over medium heat, melt the ghee and saute onion, garlic and ginger for 1 minute.  Add the tomato paste and 1/4 c water.  Stir to deglaze pan.  Add spices and stir well.

Add coconut milk, the rest of the water, and the lamb.  Stir.

Following the instruction on your unit, seal the lid on the pressure cooker, bring up to pressure, and cook for 20 minutes. 

Turn off the heat and let the pressure release naturally.  Remove the lid.

Add the chopped cilantro and the lime juice, and serve. 

We had it with basmati with scallions, and senposai paneer

I won't be buying that lamb again, but I will definitely be making this recipe again.


Thursday, July 16, 2020

RECIPE: Grilled Pork Kebabs with Fennel, Cumin and Coriander

If you don't already, you should subscribe to the NY Times Recipe Feed .  Many of their recipes are subscription-only, but a few are accessible to everyone, and they have unlocked more of them during this COVID-19 pandemic.  The recipe that inspired this one came through on that feed.

I made it as written and wasn't happy with the method (my food processor did NOT want to puree such a small amount) so I made a few changes.


Grilled Pork Kebabs with Fennel, Cumin and Coriander
Serves 4
  • 1 1/2 T. fennel seeds
  • 1 T. cumin seeds
  • 1 T. coriander seedsJuice and zest from 1/2 lime
  • 1/14 cup cilantro leaves and tender stems plus more for serving
  • 2 T. soy sauce, wheat-free Tamari, or coconut aminos
  • 2 garlic cloves, grated
  • 1 jalapeno chile, frozen and grated
  • 1 t. honey
  • 1 pork tenderloin, about 1.5 pounds, cleaned
  • 1 small red onion, thinly sliced, for serving.

In a dry frying pan on medium heat, toast the seeds until they're fragrant and slightly browned.  Cool.  Crush lightly in a mortar and pestle.  Transfer to a small bowl.

Mince the cilantro leaves until they're almost pureed, then combine them with the soy sauce, garlic, chile and honey.  Stir in the crushed spices. 


Add everything except the pork and red onion and stir to combine.

Cut the pork into 1" pieces and mix with the marinade, tossing to coat each chunk.  Refrigerate at least 30 minutes or overnight.


Heat a grill or broiler with a rack positioned 4" from the heat source.  Thread the pork onto skewers leaving a little space between each cube. Grill over the highest heat possible, or broil on high, for 2-5 minutes, then flip the skewers and continue cooking until the meat is browned and charred in spots. it should be just cooked through, slightly pink in the center.

I didn't bother with skewers - I just spread the cubes out on a rimmed sheet and turned them with tongs.

Serve with cilantro sprigs and onion slices.  I skipped the red onion and served it with mayonnaise and cilantro-jalapeno sauce.   On the side, I served sauteed celeriac.  My husband complains that celeriac always looks better than it tastes, but I love it!


NOTE: Cutting the pork into cubes meant it cooked very fast, and evenly, which is a good thing.  Next time I may try cooking the tenderloin whole. 


,

RECIPE: Kielbasa, Senposai, and Aduki Bean Soup

I needed a quick dinner tonight, and wanted to use senposai, but there are precious few recipes for it on the internet so I decided to co-opt a recipe I'd made last year but substitute senposai for the kale.  I also subbed in aduki beans for the white beans because we've been eating so many white beans lately that I wanted a change!

Original recipe:  Kale, Kielbasa and White Bean Soup

Kielbasa, Senposai and Aduki Bean Soup
Serves 8

30 small leaves of senposai, stems removed and discarded
1 pound kielbasa sausage, sliced thin
1 bunch green onions, sliced
6 cups broth (I used a combination of veal and chicken)
2 cans (15.5 oz) aduki beans, with their liquid
2 t. himalayan pink salt
1 t. minced fresh rosemary leaves
OPT: 1/4 t. cayenne or to taste

Roll senposai leaves into tight tubes and cut crosswise into 1/4" strips.  Slice each roll in half or you will have strings of senposai that could be eaten like spaghetti!

Heat oil in a large heavy saucepan over medium heat.  Cook kielbasa in hot oil until browned, about 5 minutes.  Stir in green onion and cook until soft, about 3 minutes.  Add senposai and cook until it wilts, about 3 minutes.

Pour chicken broth over, add beans and stir.  Bring the mixture to a boil, reduce heat to low, and simmer until senposai is completely tender, about 15 minutes.

Adjust seasoning and serve with crusty bread.


RECIPE: Cold Cauliflower Soup with Roasted Pepper Puree

This soup is so pretty - creamy white with a red swirl - that I've served it as an appetizer at Christmastime.  Because it's served cold, it's also a great make-ahead starter for any 'company' meal, and it's wonderful when the weather is really hot because it's RAW, so all you need to prepare it is a blender.

This recipe can NOT be doubled because it won't fit in the blender, but I will often make two batches (to use up the whole cauliflower) and then combine them..

I normally serve it with roasted red pepper puree, but tonight I had mine with leftover lovage oil (it's also good with pesto or pistou), and my husband had his with chili orange oil

In the photo below, I served it with carrot salad with harissa and mint haloumi, and cucumber salad, for a cool meal on a hot day.

Cold Cauliflower Soup with Red Pepper Puree
Makes about 4 cups


  • 1/2 head of cauliflower
  • 1 cup water
  • 2/3 cups cashews
  • 2 t. onion powder, or 2 T. onion flakes
  • 1 clove garlic, grated, or 1 t. garlic powder
  • 2 T. fresh lemon juice
  • 1 T. honey
  • pinch white pepper
  • Himalayan pink salt to taste
For serving: Roasted Pepper Puree (see recipe below)


Put the cashews into your blender jar and add the water.  Let them soak a few minutes to soften, while you break up the cauliflower. 

Remove the stem and all the leaves from the cauliflower, then remove any brown or discolored spots.  Chop it up and measure out 2 cups.  Add to the blender jar along with all the other ingredients (except the red pepper puree which you will use when you serve it).

Blend until smooth.  I used to make this in a regular (Waring) blender and it seemed like it took FOREVER to get creamy.  I had to stop it periodically to scrape down the sides.  It did eventually get there, though, so if you don't have a high power blender, just hang in there.

In a high powered blender, like a Vitamix or Blendtec, it shouldn't take more than 2 minutes.  If you press the "soup" button, it will heat the soup, and I prefer to eat this cold, so I just use the 'puree' button.  Stop once and scrape down the sides.


Pour into soup cups or bowls, drizzle with red pepper puree (or lovage oil, or pesto, or pistou, or chili orange oil, and serve.  (For Valentines day, pour a dot of red pepper puree in the center and then use a toothpick to drag out a heart shape.)

Roasted Pepper Puree
Makes 1/2 cup


  • 1/4 cup roasted red peppers with their liquor*
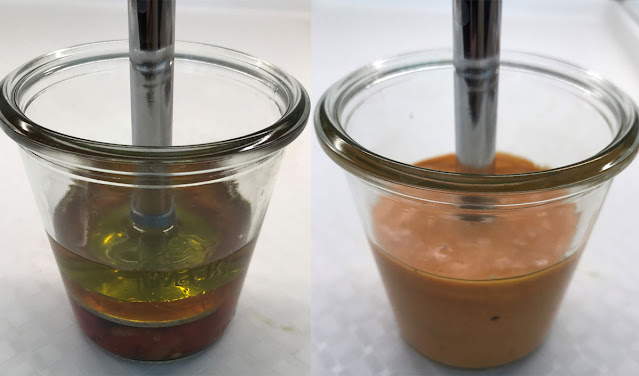
  • 1/4 cup safflower oil or light cream (I've used both, but the photo shows oil)
  • 1 t. lemon juice
  • pinch cayenne powder
  • pinch himalayan pink salt

This is much easier to make if you have a small jar that your immersion blender head JUST fits into.  I use a Weck terrine jar. 

Combine all ingredients in a 1/2-pint jar and use an immersion blender to create a puree.  Do not over-blend or the EVOO will become bitter.  Strain through a fine mesh sieve to remove any large pieces.

If you don't have an immersion blender, use a coil whisk to puree the peppers, and then gradually blend in the oil/cream until you have an emulsion.  The quantity is too small for either a blender or a food processor.

* If you roast your own peppers, you can make this with any color.  I have made it with yellow peppers, orange peppers, and red peppers, and then layered them on top of the soup.  The photo below is from a party we hosted many years ago where this was offered as a serve-yourself appetizer.


Monday, July 13, 2020

RECIPE: White Bean Salad that Tastes Like Tuna?

Hmmm.  The original recipe sounded good - chickpeas made into a salad that tastes like tuna.  Unfortunately, it doesn't taste anything like tuna salad!  But, it tastes good, and I make it often because it's a quick meal, wrapped in a lettuce leaf.

Original Recipe: Chickpea of the Sea

Lemony White Bean Salad
Serves 4-6

  • 1 28oz can of white beans, drained
  • 3 ribs celery, finely chopped (about 1 cup)
  • 1/2 large onion, finely chopped (about 1/2 cup)
  • 1/3 cup mayonnaise
  • 1 t. Dijon mustard
  • Zest and juice from 1 small lemon
  • 1 t. chopped fresh dill
  • 1/8 t. ground bay leaves
  • salt and pepper to taste

In a large bowl, mash the beans slightly.  Add the celery and onion.

In a small bowl, combine the remaining ingredients and mix well.

Fold the dressing into the beans and taste for seasoning. 


Sunday, July 12, 2020

RECIPE: Carrot Salad with Harissa and Mint Haloumi

The original recipe for this salad called for feta; but, our farm is now selling mint haloumi, so I decided to use that instead and it was delicious!  If you can't get haloumi, use feta instead.


Carrot Salad with Harissa and Mint Haloumi
Serves 4 as a side dish.
  • 3/4 pound carrots, peeled, trimmed, and coarsely grated
  • 4 T. olive oil
  • 1 large clove garlic, crushed
  • 1/4 t. ground caraway seeds
  • 1/2 t. ground cumin seeds
  • 1/2 t. paprika
  • 3/4 t. harissa (I used 1.5 teaspoons*)
  • 1/2 t. sugar
  • 3 T. fresh lemon juice
  • 1 t. Himalayan pink salt
  • 2 T. flat leaf parsley, finely chopped
  • 2 T. fresh mint, finely chopped, or 1 t. dried

I used a box grater to grate my carrots, and they're much smaller pieces than the ones in the original recipe, which were grated in a food processor.  I prefer carrot salads made with a finer grate (juicer pulp is best!) even though the larger grate looks better in pictures.

Heat the oil in a small saute pan over medium heat and add the garlic, caraway, cumin, paprika, harissa, and sugar.  If you're using dried mint, add that, too.  Saute until fragrant, just to take the raw edge off the garlic, 1-2 minutes.

Remove from heat and add the lemon juice and salt.

Pour over the carrots and mix.  Add the herbs and mix.  Leave to infuse for one hour.

Add the feta, mix and serve.

* I make our harissa with cayenne pepper, which is fairly mild, and I use many other spices, so ours may not be as hot as a purchased harissa (I can't say for sure, because I've never bought one, but the ones I've had in North African restaurants were SEARINGLY hot!)  Adjust the quantity in this recipe based on your heat tolerance, and the amount of heat in your harissa.


Saturday, July 11, 2020

RECIPE: Risotto with Red Chard, Leeks, Garlic Scapes, Tarragon, Cream and Walnuts


I have made this with pasta many times, it's one of my favorite way to use swiss chard (the other is this recipe, with white beans).  Last night, to change things up, I made it as risotto.

Risotto with Red Chard, Leeks, Garlic Scapes, Tarragon, Cream and Walnuts
Serves 6-8


  • 4 T. ghee or EVOO, divided
  • 10 garlic scapes sliced into 1" pieces
  • 1 c. minced leek, white and light green part only (I use onions when I'm out of leeks)
  • 1 pound swiss chard, preferably red, stems cut from leaves and both chopped into thin slices
  • 1/4 t. pepper flakes (optional)
  • 1/3 c. broth (I use veal broth, vegetarians can use water)
  • 1.5 cups short grain rice (sushi, arborio, carnaroli, or vialone nano)6-8 cups liquid (water, broth, or a mixture)
  • 1-2 t. himalayan pink salt (more or less depending on whether you use salted broth)

  • 2 T. minced fresh tarragon (you can use parsley if you don't have tarragon)
  • 2/3 - 1 c. heavy cream
  • 3 T. toasted walnut halves, broken into small pieces (I use soaked and dehydrated)
  • Parmesan  or Asiago cheese (optional)

In a skillet set over medium heat, melt 1 T. ghee and saute garlic scapes until softened and slightly charred.

Reduce heat to moderately low and melt remaining 1 T. ghee, add leek, chard stems, and salt and pepper to taste. Cut a round piece of waxed paper to fit the size of your skillet and place it over the vegetables. Cover the skillet with a lid and cook for 5 minutes.


Remove the cover and waxed paper. Now add the chard leaves, red pepper flakes, and broth,  Replace the parchment and cover and simmer the mixture, stirring occasionally, for 5 minutes more.  Transfer to a small bowl.   


Increase heat to medium, add 2 T. EVOO to the pan and saute the rice until it's opaque. 

Add 1/2 cup* of broth/water and increase heat to high.  Continue to cook, stirring constantly, until you can see the pan bottom as you stir.  Add another 1/2 cup water/broth and continue in this manner for 10 minute, adding 1/2 cup liquid whenever you can see the pan bottom.  After 10 minutes, the rice should be half cooked: the outside of each kernel should be translucent, and the center should be opaque.

Add the salt (if using) and the reserved chard mixture to the rice.

Add 1/2 cup of broth/water and continue as before for another 8 minutes.  You may need more or less water depending on how old your rice is and how hot your burner is. 

The rice should be almost done now.  Only a very small dot of opacity should remain in the center of each kernel.

Reduce the heat to medium and add the cream and the tarragon.  Cook, stirring, for another 2 minutes until the rice is cooked and the cream has been incorporated. 

Serve sprinkled with chopped walnuts and grated cheese.  (I served it with carrot salad).


* If your burner doesn't get very hot, you will need to add the water 1/4 cup at a time so that the temperature of the liquid doesn't drop too drastically with each addition.  Your burner should be able to maintain a good simmer after each addition of liquid.  If your burner is very weak, you will need to heat the liquid before adding it.


At this point, I would like to tell you that the leek I used for this dish had been in our fridge for 10 months.  Yes, almost a year!  Because it was sown and harvested according to the biodynamic calendar, it was still good almost a year later!!!  I have 5 more of these to tide me over until they appear in the farm store.

cleaned leek on cutting board with lemon and knife
10-month old biodynamic leek!


Friday, July 10, 2020

RECIPE: Zucchini with Olive Oil, Brown Garlic, Basil and Mint

I've made this recipe for years, and still love the combination of olive oil, garlic, basil and mint.  

Zucchini with Olive Oil, Brown Garlic, Basil and Mint
zucchini ribbons with olive oil, brown garlic, basil, mint, and lemon zest in stainless pan
Serves 4-6
  • 8 small-medium zucchini, green and yellow*
  • 2 T. EVOO
  • 2 cloves garlic, sliced paper thin (I used a truffle slicer)
  • 1/4 t. chili flakes
  • 2 T. himalayan pink salt
  • 1 T. basil chiffonade
  • 1 T. mint chiffonade, or 1/2 t. dried mint
  • Zest from 2 lemons

Bring a large pot of water to boil.

While you wait, cut the ends off the zucchini and slice lengthwise into 1/16" slices.  I used a mandoline.  If your squash are too big, and the core is wet and seedy, remove it and dice it.**

In a large pan over low heat, saute the garlic and chili flakes in the olive oil until the garlic is light brown.  Add the diced core if you have any and cook until all moisture has evaporated.  Turn off the heat until the zucchini ribbons are cooked.

Brown garlic and the center of one zucchini

When the pot of water reaches a boil, add the salt and the zucchini ribbons.  Cook for 3 minutes, then drain and add to the pan with the brown garlic.  Don't over cook the zucchini or it will fall apart when you combine it with the other ingredients.

Top with the basil, mint, and lemon zest and stir gently to combine.  The flavored oil should coat each ribbon.  Taste and adjust seasoning.

Serve warm as a side dish, or cold as a salad.


* I prefer the taste of yellow zucchini but it seems to be more fragile than the green variety and it's harder to find.

** I have also made this by slicing the zucchini and sauteing it after I brown the garlic, but it's harder to cook all the slices uniformly, and it's not as impressive visually.  It's much less work, though,and uses one less pot.