Friday, November 11, 2022

RECIPE: Leeks Coddled with Beans and (optional) Lamb

Yotam Ottolenghi posted the original recipe for this on his Instagram page and I was drooling!  I made it a few days later, replacing the olive oil with ghee.  I also added some lamb, because lamb and lentils go well together and I wanted to serve it as our meal.  

The leeks and lentils are delicious on their own, but the leek cream takes them to the amazing level!  

I followed the recipe mostly as written, but I suspect it would be just as good with any other bean, and much easier if you use canned!  I also suspect you don't have to baby the leeks they way they describe in the original recipe.  I'll post photos the next time I make it.

Original recipe: Confit leeks with lentils and lemon cream

Leeks Coddled with Beans and (optional) Lamb

Coddled Leeks with Lentils

Serves 2-3 as a meal

INGREDIENTS

  • 5 leeks, cleaned and dark green leaves removed
  • 10 garlic cloves, halved
  • 1/2 t. dried thyme (I used powdered)
  • Himalayan pink salt and freshly ground black pepper
  • 1/4 cup ghee, melted
  • 1 18 oz can lentils, white beans, or garbanzo beans, drained
  • Optional: 1 c. cooked lamb (I used canned stew meat)
  • 1/3 c. heavy cream
  • 2.25 t. Dijon mustard
  • 5 T. lemon juice, divided
  • 3 T. parsley chiffonade
  • 3 T. minced dill
  • 1 t. dried tarragon, crumbled (use 1 T fresh if you have it, I rarely do!)

INSTRUCTIONS

Preheat oven to 350F.  Melt the ghee in an 8" x 12" baking dish while the oven is preheating. (I made this in our toaster oven, which was exactly the right size,)

Slice the leeks into 1/2" pieces.  Arrange the leeks cut side up in the preheated baking dish and nestle the garlic between them.  Baste the tops with some of the melted ghee.  Sprinkle with thyme, salt and pepper.

Leeks, garlic, ghee, and thyme ready for oven

Cover the top with a piece of parchment paper, then cover the dish tightly with foil and bake for 30 minutes.  (The parchment prevents the foil from touching the food.)

Remove the dish from the oven, remove the foil, and gently turn the leeks over using 2 forks or a pair of tongs.  Replace the foil cover and bake for another 30 minutes, until the leeks are completely soft.

Raise the heat to 400F.

Remove the dish from the oven and transfer 1/2 cup of cooked leeks and 5 cloves of garlic to the bowl of a food processor.  I transferred the light green leeks and left the white ones.

Add the drained beans (and the lamb if you're using it) to the pan with the leeks, season with salt and pepper, and toss gently to combine.  Return to the oven and bake for 15 minutes to heat the beans.  

While the beans bake, make the leek cream: add the cream, mustard, 1 T. lemon juice, and 1/2 t. salt to the leeks and garlic in the processor bowl and then puree until smooth.


Remove the pan with the leeks and beans from the oven, stir in the remaining 4 T. lemon juice, and sprinkle with the herbs.  Stir gently to combine.  Serve alongside the leek cream.  

In the photo below I stirred the leek cream into my portion.

Leeks, lentils, and leek cream - sublime!


Saturday, November 5, 2022

RECIPE: How to Roast Kabocha Squash Whole

I LOVE roasted sunshine kabocha squash - it is smooth, sweet, and creamy - but the larger ones are very hard to cut in half.  My friend roasts butternut squash whole so I decided to try roasting kabocha whole and it worked perfectly!

Sunshine kabocha is sort of squat, deep orange, and has a dark green star on the blossom end.  I apologize for the crummy photo of the star below but it's the only one I have!  The stem end is thick and also hard to cut through.  Sunshine doesn't keep well, so I roast it, puree it and freeze it.  Green kabocha isn't as sweet as sunshine, but it keeps longer and gets sweeter as it sits. 

How to Roast Kabocha Squash Whole

On the left: sunshine kabocha squash green star.  On the right: roasted sunshine kabocha puree.
 

INSTRUCTIONS

Preheat oven to 425F.

WASH the outside of the squash!  Even though you won't be eating the skin, if there is dirt on it it will enter the flesh when you cut it open.

Arrange the squash on a baking pan - no need to pierce them - and roast until the outside is blistered and a knife can be easily inserted through the flesh.  No, they will not explode if you don't pierce them.  If anything, they will IMplode.  Remove from the oven and allow to cool on the baking pan.

Whole roasted sunshine kabocha squash

Remove the skin from the top half and discard it.  

In the photo below, I have my salad spinner bowl in the sink on the right, and I'm discarding skin and seeds into that bowl so we can put them out for the deer.  We don't put the seeds in our compost because they survive, and we don't put them in the trash because they attract bears.  We toss them in the forest behind our house and hope the deer find them before the bears do.

Remove the skin from the top half.

Remove the flesh from the top and transfer it to a food processor.  Take care to leave the seeds behind! 

Remove the flesh from the top exposing the seeds.

Remove the seeds and discard them.  Some people roast them but I've never had success with that. 

Remove the seeds.

Scrape the flesh from the remaining skin and transfer to the food processor.  

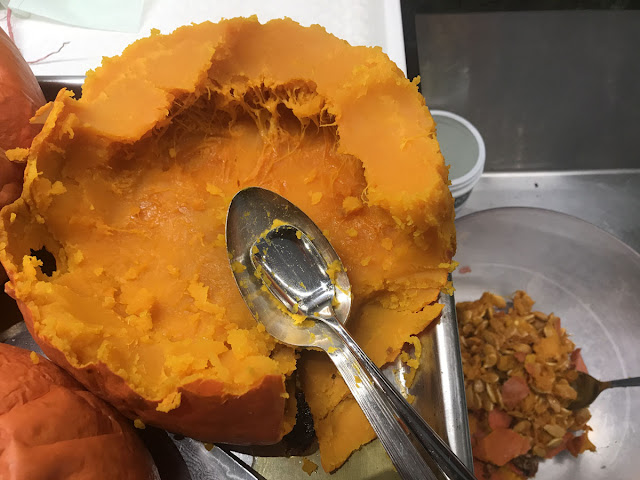
Remove the flesh from the bottom half.  A flat edge ice cream spoon is best for this.

Remove as much flesh as possible!


Process until smooth and creamy.  

I've never tried to do this in a blender.  I'm not sure it would work because the flesh is fairly dense and it might cause cavitation.  If you try it, please LMK whether it works!

Sunshine kabocha before and after being pureed in my food processor.

Transfer to a glass jar and refrigerate or freeze until needed.  


I use this to make pumpkin lattes, pumpkin soup, pumpkin mac and cheese, pumpkin martinis (recipe coming soon), and I'm going to attempt a pumpkin roll. 


Friday, October 28, 2022

RECIPE: Pumpkin Latte

Notice that I said PUMPKIN Latte, not pumpkin spice latte.  This latte is made with roasted pumpkin puree, not the spices used to make pumpkin pie!

I use sunshine kabocha because the flesh is slightly sweet and very creamy.  It's high in fiber and makes a rich low-dairy drink.  If you can't get sunshine kabocha, you can use pie pumpkin but you might need a little extra sweetener (I need an additional teaspoon of maple syrup when I use pie pumpkin).  I suppose you can use canned pumpkin, but I haven't tried that.

Roast the squash or pumpkin whole, remove the seeds and rind, and then puree it in a food processor.  I keep it in glass jars in the back of the fridge.

Pumpkin Latte


Makes 1 serving

INGREDIENTS

  • 1/4 c. sunshine kabocha puree
  • 1 T. maple syrup
  • 8 ounces strong coffee
  • Heavy cream to taste
  • Optional: pinch of pumpkin pie spice 
  • Optional: 1 scoop of collagen peptides

INSTRUCTIONS

Heat the pumpkin puree with the maple syrup.  I put it in a custard cup and set it on my coffee mug heater (This is the mug heater I like best. It gets hot quickly, has a large surface area, and has two heat settings.  It also has an auto-shutoff.).  You could nuke the puree, but I prefer not to nuke my food.

Heating the pumpkin and maple syrup on my mug warmer

While the pumpkin is heating, fill a large - at least 12 ounces - mug with hot water, and microwave it for a minute or two to heat the mug.  Leave the hot water in the mug until the pumpkin is hot.

Throw out the hot water in the mug and transfer the pumpkin to the hot mug.  Fill the mug with coffee, stir to combine with the pumpkin, add the collagen peptides if you use them and then add cream to taste.  

Sprinkle with a pinch of pumpkin pie spice if you like.


NOTE: You could also make this by heating the pumpkin, maple syrup, and 6 ounces of milk in a small saucepan, and then adding 2 oz of espresso, but that's one more pot to wash!   I would do it that way only if I was making more than one. 


RECIPE: How to clean and blanch large amounts of spinach

There is LOTS of spinach in the farm store, so I've been processing it to eat over the winter.  Here's how I do it.  The reason I blanch the spinach instead of wilting it in the water left on the leaves after washing it is because there are oxalates in spinach and blanching removes some of them.

Fill your sink half full with spinach, then cover with tepid water and swish the leaves around.  The warm water will encourage any dirt on the leaves to fall away.  As you swish, remove any leaves that are brown, yellow, or decayed.  Let the leaves sit in the water undisturbed for about 10 minutes so the dirt will fall to the bottom of the sink.

Some days there will be LOTS of dirt, other days only a little:

Lots of dirt!


Some but not much dirt

Lift the leaves out of the sink leaving the dirt on the bottom.

Drain the water but don't let the dirt go down the drain.  You don't want the dirt in your septic system because it doesn't decompose.  I remove it with paper towels and throw it in the trash or compost.

Start filling the sink with fresh tepid water.  Put the spinach back into the sink one leaf at a time, rinsing it under the running water and removing any unsavory leaves that you missed earlier.  Swish them around and let them sit for 10 minutes.  

Lift the leaves out of the sink leaving any dirt on the bottom.  For me, there was almost no dirt in the second rinse, so I used the water as the first rinse for the next batch. 

No dirt in second rinse

As you can see, I do NOT remove the large stems.  I keep them for two reasons:  one is that they add bulk to the cooked spinach so I get more spinach out of each batch, two is that the stems have a lot of nutrition because they are closest to the soil.  If the soil is contaminated, then you don't want to keep the stems, but our farm's soil is clean and vibrant with much nutrition so I keep the stems! 

Bring 8 quarts of water to boil in a large stock pot.  I used a 16-quart pot and filled it half full of water.  If you don't have a pot big enough, use the largest one you have.  It will take longer because you can't blanch as much at one time, and you will need to periodically replace the water with fresh.  

Set a large colander over a dinner plate or bowl.  Add the spinach to the boiling water - as much as the pot will hold - and stir to submerge.  Blanch for 2-3 minutes. 

Blanch 2-3 minutes

Remove with a skimmer to the colander.  


Remove to colander with skimmer.
 

Repeat with another batch until all the cleaned spinach has been blanched.  Turn the heat off under the water while you clean another batch, then blanch that batch.   Repeat until all the spinach is clean and blanched.

When cool enough to handle, squeeze out most of the water. The harder you squeeze, the more you will damage the leaves, so I try to do this gently.

Squeezed spinach
 

At this point, I either vacuum seal the spinach and then freeze it, or I transfer it to a glass container and  refrigerate it.  It keeps for about 10 days in glass.  

Vacuum sealed spinach ready for freezer
 

When I use the blanched spinach without freezing, I pull the stems together and chop them first, before chopping the leaves.

Chop the stems first

Stems and leaves chopped.

You can use a food processor to chop the spinach but it will create a very fine mince:

Spinach chopped in food processor


One crate holds about 5-6 pounds of raw spinach, which will blanch down to about 2-3 pounds, depending on how much water you squeeze out.  


RECIPE: Curried Spinach Stuffing for Delicata or Open Face Sandwich

This recipe started out as stuffing for delicata squash.  I had some left over and offered it to my husband for dinner (he doesn't like delicata).  He spread it on a piece of bread, heated it up, and then dolloped some sour cream on top.  He liked it so much he had a second one!  

(Yes, I've been making a lot of stuffed delicata lately!  It's in season, it's versatile, it's delicious, it's high in fiber, it's easy to prepare, and leftovers keep well!)

Curried Spinach and Beef 

Stuffing for Delicata Squash 

or Open Face Sandwich Spread


Makes about 6 cups, enough for 10-12 small squash

INGREDIENTS

  • 1/2 c ghee, divided
  • 6 cups of chopped onions
  • 1/4 c minced ginger
  • 1/4 c. minced garlic
  • 2 T plus 1 t.. curry powder, divided (I use Pure Indian Foods brand)
  • 2 pounds of spinach, blanched, squeezed dry, and chopped
  • 3/4 pound of cooked ground beef (optional, you can use leftover chicken or hard-boiled eggs instead)
  • 8 small delicata squash
  • Salt and cayenne pepper

INSTRUCTIONS

Preheat the oven to 425.

SCRUB the delicata squash to remove any dirt on the skin.  You must do this even if you don't plan to eat the skin because any dirt on the outside will enter the squash when you slice it.  

Cut the ends off each squash, cut them in half lengthwise, and remove the seeds (I use an ice cream spoon for this because it has a flat bottom).

Arrange the squash on a baking dish (I use a half-sheet jelly roll pan) cut side down.

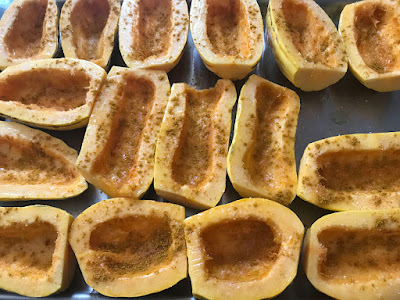
Melt the ghee in a large saute pan and use some of it to brush the bottom of the squash.  Flip the squash over and brush the tops.  Season them with salt and 1 t. curry powder.  

Bake for 20 minutes or until a knife slides easily into the flesh and the tops are lightly browned.  Remove from the oven but leave them on the pan.

While the squash is cooking, saute half the onions in the remaining ghee until lightly browned.  


Push the onions to the sides of the pan and add the ginger and garlic to the center.  Stir until they're heated and then mix them with the onions.  Add the rest of the onions and saute until translucent.   

Push to the sides of the pan and add the remaining curry powder to the center.  Stir to combine with the fat in the pan, then stir to combine with the rest of the contents.

Reduce heat to low and simmer for 5 minutes.  You want to lightly cook the onions and infuse them with the curry flavor, you don't want them to be mush. (NOTE: the ginger will also be only lightly cooked.  We like the burst of flavor when we bite into a small piece.  If you don't, add the ginger to the pan with the first batch of onions and it will cook all the way through and soften.)

 
Add the spinach and (optional) beef and stir to combine.  Add salt and cayenne to taste (I used 2 t. salt and about 1 t. cayenne).  The filling should be highly seasoned because the squash is not.  As you can see below, this filling is mostly vegetables with a little bit of meat.

Fill the squash boats.  I fill them just to the rim so that I can stack the ones I don't eat right away, but you can mound the filling if you're going to consume them all.  

Reduce oven heat to 400 and bake the squash for 15 minutes, or until the filling is heated through and the tops are golden brown.  Serve.  If you overdid the cayenne, use sour cream to tone down the heat.


Leftover filling can be used for bell peppers, zucchini, eggplant, and bread! 


Wednesday, October 26, 2022

RECIPE: Delicata Squash Stuffed with Veggies and Meat

I used this stuffing in red bell peppers and my husband said it was the best I'd ever made.

This is sort of an UN-recipe, one where I describe the procedure, and you use whatever amounts you have on hand.  I prefer to use small squash, so I can eat the skin.  When I use the bigger ones, they're very hard to cut and the skin gets too hard to eat.  

I've read that you can nuke them for 2-3 minutes to soften them so you can cut them, but I prefer not to nuke my food!

Stuffed Delicata Squash


  • baking pan (I used a half-sheet jelly roll pan)
  • Small delicata squash, amount to fit the pan you're using (I used 8)
  • Ghee, melted
  • Yellow onions, minced 
  • Celery stalks and inner leaves, minced
  • Carrots, peeled and minced
  • Sweet peppers, minced - I used red, you can use any color
  • Garlic, peeled and minced
  • Seasoning - I used berbere, you can use curry, italian, mexican, cajun, 
  • Spinach, blanched, drained, and chopped (I like LOTS of spinach!)
  • Cooked meat - I used ground beef, you can use veal, lamb, or chicken instead
  • Optional: grated cheese

Preheat oven to 425.

SCRUB the squash to remove any dirt!  Even if you don't plan to eat the skin, if there is dirt on it it can enter the squash when you cut it open.

Cut the ends of the squash and then cut them in half lengthwise.  Remove the seeds (I use an ice cream spoon for this, because it has a flat end).  Arrange on a baking dish cut side down and brush with ghee.  Flip them over and brush the tops with ghee.  Sprinkle with salt and pepper.

Roast 20 minutes, or until a knife slides easily into the flesh and the tops are a little browned.  

Remove from oven, but leave them on the baking pan.


Meanwhile, saute the onion in the ghee until lightly browned. 

Add the celery, carrots, garlic and seasoning and saute until slightly softened.


Add the spinach and meat and stir to combine.  Season with salt and pepper.


Stuff the squash with the mixture.  You can sprinkle with cheese, if you want.

Return to the oven for 20 minutes until the stuffing is heated.  


These are delicious right out of the oven, and also cold the next day(s).  


RECIPE: Cabbage Roasted and Creamed

I stumbled on this recipe while searching for something else and it looked so good I had to try it.  The roasted cabbage was delicious, but my first attempt of the creamed portion was a little bland for our tastes so I punched it up a bit.  

Original recipe: Roasted Cabbage with Cabbage Cream

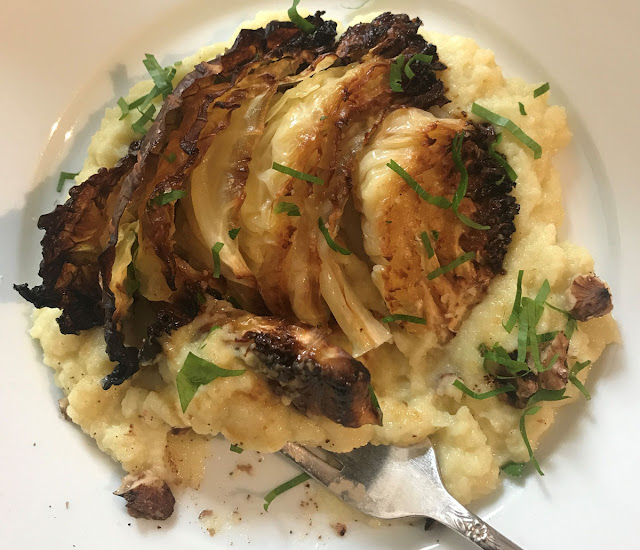
Roasted Cabbage on a Bed of Creamed Cabbage

Serves 4-8

  • Two heads cabbage (I used savoy, you can use any green cabbage)
  • 1/2 cup ghee, melted and divided
  • 2 cups broth (veggie, beef or chicken)
  • Salt and pepper 


Preheat oven to 350.

Cut one head into eight wedges leaving them attached at the core: cut in half vertically, cut each half in half, then cut each quarter in half.  Arrange them on a baking sheet (I used our toaster oven).  Brush the tops with melted ghee, flip them and brush the remaining sides.  You should use about 1/4 c. of the ghee.


Roast for about 1 hour, rotating the pan after 30 minutes, until they're cooked through and the edges are browned.  Salt lightly.


While the first head is cooking, cut the other head into chunks. Bring the 2 cups of stock to boil over medium heat, add the cabbage, reduce heat to med-low and simmer, partially covered, until the cabbage is very soft and the broth is reduced by half.  About 30-45 minutes.  Make sure the pan doesn't boil dry!

Transfer the cabbage and the reduced broth to a food processor, add the remaining 1/4 c. of ghee, and puree.  Season with salt and pepper.  

Place the creamed cabbage on a platter, arrange the roasted cabbage on top, and serve.  Parsley chiffonade made it look nice but didn't add anything taste-wise.  Two wedges over one quarter of the cream was a nice size meal for me.  One wedge on 1/8th of the cream is a good side dish with, for instance, sausages, which is how my husband eats it. 


This reheats nicely in a small dish in a 350F oven.


Tuesday, May 24, 2022

RECIPE: Improved Copycat GRANOLA without seed oils

The best Granola we've ever purchased is from Plowshare Farm.  They sell it on ETSY, and in our farm store.   My husband eats so much of it, I decided to try and make it myself.  I made a few changes - eliminating seed oils for instance - and it's now "the best granola ever!" according to my husband...

GRANOLA without seed oils 
 

Makes 10 cups.

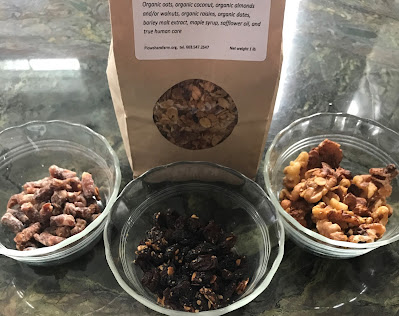
I started out by separating the components in the Plowshare bag, weighing them, and measuring them.

I came up with the following:

  • 41 g. walnuts (1/3 cup)
  • 39 g. raisins (1/4 cup)
  • 26 g. dates (3 T.)
  • 35 g. oats plus coconut (about 2 c.  I was unable to separate these)

Using several recipes I found online as a guide to the process and baking times, I then made one recipe using those exact proportions, but substituting coconut oil for the sunflower oil.  It was good but we thought it could be better.  

Using cacao butter gave it a slightly chocolate flavor, and replacing the raisins with currants and unsweetened tart cherries joint-friendly.  Replacing the walnuts with cashews and macadamia nuts reduced the omega-6 even further.  I've also just started using sprouted oats, because they have a lower glycemic index.

Several iterations later, this is the version we like the best.  It's also the healthiest I've found anywhere!

I no longer chop my own dates, I buy organic Kartago chopped date cubes here.  They're covered with rice flour.  This brand, which I have not tried yet, does not use any flour.

YOU WILL NEED TWO SHEET PANS, AND TWO OVEN RACKS FOR THE AMOUNT BELOW.  If you don't have two of each, you should halve the recipe.  

INGREDIENTS

  • 6 cups rolled oats, preferably sprouted**
  • 3/4 c. cashew chips (my sister prefers almonds, use whatever nuts you like)
  • 3/4 c. macadamia chips (cashew and macadamia nuts are low in omega-6)
  • 1.5 c. date cubes (if you cube your own, you will need about 9 large medjul dates)*
  • 1.4 c. currants
  • 1.3 c. tart cherries withOUT added sugar
  • 1 T. Ceylon cinnamon (use less, if you prefer Vietnamese cinnamon)
  • 1 t. vanilla powder
  • 1/2 c. cacao butter
  • 1/2 c. maple syrup
  • 1/4 c. malt extract*

INSTRUCTIONS

Line 2 baking sheets with parchment paper.

Preheat oven to 325F. 

Skip the next step if you're able to source date cubes.

Slice dates into 1/4" strips and sprinkle with some malt extract (about 1-2 T.).  Slice into 1/4" cubes and sprinkle with malt extract to coat each piece (about 1-2 T.).  SET ASIDE to 'dry' while you bake the granola.  Do not mix with the oats until they're cooked!

Sliced dates on the left, sprinkled with malt powder, chopped dates on the right.
 
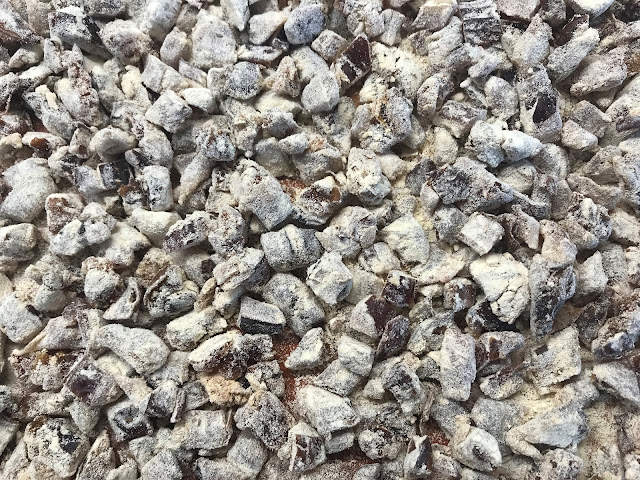
Close-up of chopped dates covered with malt powder.

START HERE if you're able to source dates cubes!

Mix the oats, nuts, cinnamon and vanilla in a large bowl.  DO NOT ADD THE FRUIT AT THIS TIME!

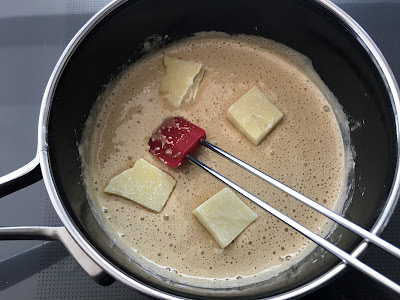
Mix the maple syrup with the remaining malt powder in a small saucepan.  Stir over low heat until the malt melts into the syrup.  Add the cacao butter and stir until melted.


Add cacao butter to maple-malt mixture

Pour the maple-malt-cacao-butter over the oat-nut mixture and stir to coat evenly.

Pour maple-malt-cacao-butter over oat-nut mixture

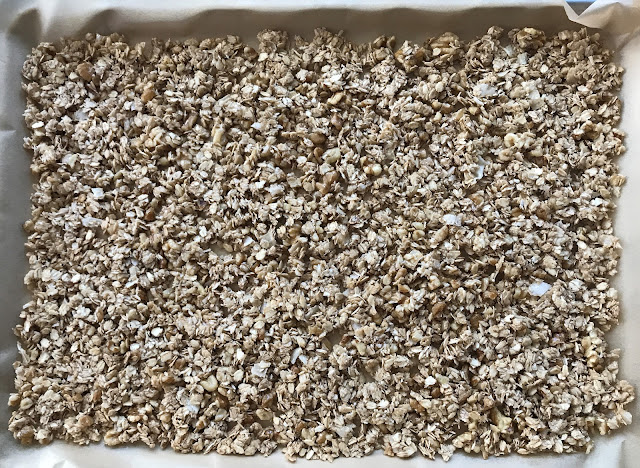
Spread evenly on the parchment-lined baking sheets.  Don't wash the bowl - you'll use it later.

Spread evenly in parchment-lined sheet pan


Bake, stirring every 15 minutes, for 30 minutes.  REDUCE THE HEAT TO 300F.  Continue baking for another 30 minutes, stirring every 15 minutes, until golden brown.  Rotate the pans and swap oven racks so they brown evenly.  I KNOW...all this stirring and swapping is a pain, but it does end up more evenly toasted that way.  I tried stirring every 20 minutes and nearly burned them! 

When I make this, I make a double recipe using 4 sheet pans, and I rotate them so that each pan spends time on each rack.  I end up with 3 half-gallon jars of granola. If you only have one oven rack you should halve the recipe and use one sheet pan.

If you don't like big chunks, break them up as you stir.  

In my oven it took 1 hour, in my sister's oven 30 minutes.

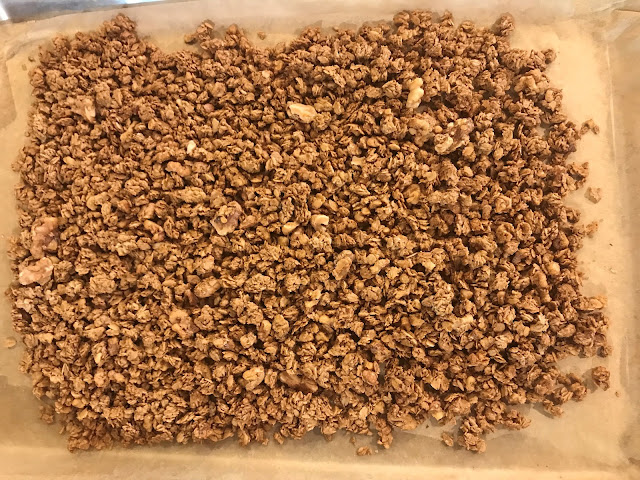
Baked oat-nut mixture


Cool on the sheet pans. 

Transfer back into the bowl you used to mix it together.  Add fruit and stir to combine.  If you add the fruit before you bake it, the fruit will burn.  

Transfer to a glass container with a lid.  It should keep for 2 months in a cool dark place (cabinet or basement).  Don't store it in an open container, or it will lose its crispness.

*NOTE:  If you can find chopped dates covered with coconut or some other powdery substance you won't need to coat them in malt powder.  Malt powder is slightly sweet but loaded with nutrients that sugar does not have.  You can leave it out, or substitute another sweetener, like brown sugar or Swerve.  My sister leaves it out entirely.  I suppose...you could try coating the dates in coconut flakes...let me know if it works!

**You can use up to 2 cups coconut instead of some of the oats, but we prefer it with just oats.