Friday, June 4, 2021

RECIPE: Scrambled Eggs with Senposai and Chive Blossom Hollandaise

Here's another quick recipe using SENPOSAI!  It uses only one pan, and dinner was on the table in 30 minutes. If you make the hollandaise fresh, add the egg whites to the scrambled eggs.

Scrambled eggs are my last-minute solution to the  'oops, I forgot to plan dinner' dilemma.  If I have spinach or arugula in the fridge, I usually add it to the eggs, so I decided to try the recipe with senposai.  As you can see, we like a high senposai-to-eggs ratio.  Feel free to use less. 

After dinner, my husband declared he was a senposai fan!  

The next day, he used the leftover eggs in an open-faced sandwich, layered between ham and cheese and then baked until the cheese melted.

The hollandaise is optional, turning the meal into a deconstructed Florentine Eggs Benedict.  I made it because I had chive blossoms that needed to be used, and we now use cold hollandaise instead of 'mayonnaise'.  It was so good I'm making a second batch before the chive blossoms are all gone.

Scrambled Eggs with Senposai and Chive Blossom Hollandaise

Serves 4

Ingredients

  • 3 T. ghee
  • 2 cups chopped onions (1 large or 2 medium)
  • 4 cups chopped senposai, including the stems
  • 1.5 t. himalayan pink salt
  • 1 t. powdered jalapeno, cayenne or black pepper to taste
  • 1/2 t. cumin, either ground or seeds, your choice
  • 12 eggs, beaten to combine (I use an immersion blender for this)
  • Chive Blossom Hollandaise either freshly made or at room temperature

In a large saute pan, melt 1 T. ghee over med-high heat and saute the onions and senposai stems, stirring occasionally until the onions are dark brown on the edges.  I add the onions first and let the senposai stems steam on top of them until the onions start to brown.


If you stir too often, the onions will cook through before they brown.  If the heat is too low, they won't brown at all.  You want them nicely browned but not mushy.  This will take 10-15 minutes.


I clean and chop the senposai leaves while I'm waiting for the onions to brown.

If you're going to make the hollandaise fresh, remove the pan from the heat and make the hollandaise now.

Return the onions to medium-high heat.  Add 1 T. ghee to the pan, add the senposai leaves and cook for about 2 minutes until they're wilted but still bright green.  Don't overcook them as they will continue to cook after you add the eggs.


Season with salt, pepper, and cumin.

Add the last tablespoon ghee to the pan.  Add the beaten eggs and reduce the heat to medium.  Stir constantly until the eggs are half coagulated, 3-5 minutes.  

Reduce the heat to medium-low and stir until they're creamy, another 3 minutes.  There should still be a little moisture in the pan - don't cook them until they're dry!


The pan I use is enameled steel, made by Chantal.  If I cook the eggs on medium or medium-low they do not stick!  You can see in the photo below, they are not stuck to the pan.  

Even if they did stick, I would not use a non-stick pan.


Serve drizzled with hollandaise and sprinkled with additional chives and blossoms.


RECIPE: Easy Chive Blossom Hollandaise

We now use hollandaise instead of mayonnaise, since I've figured how to make it quickly and easily.  

Hollandaise is not typically spreadable when cold, and it's impossible to reheat, so most recipes make a small batch to be used immediately while still warm. I make a big batch, and use a little more liquid than normal so that it's spreadable when cold.

Using an immersion blender, it comes together in minutes, and has never failed me!

Original recipe: Foolproof Hollandaise in 2 Minutes

Chive Blossom* Hollandaise


 Makes 2 cups (1 pint)

Ingredients

  • 3 egg yolks
  • 1 T. lemon juice
  • 4 T. water
  • 1/2 t. himalayan pink salt
  • 2 sticks butter
  • 1/4 cup each minced chives and chive blossoms*
  • Optional: pinch of ground cayenne or hot sauce

Scrub the egg shells before separating the eggs.  Save the whites to add to your next batch of scrambled eggs.

Combine the yolks, water, lemon juice and salt in the bottom of a pint jar.

Add the chives and chive blossoms.

Melt the butter in a small saucepan over high heat, swirling constantly, until the foaming subsides.  Transfer to a 2-cup heat-proof liquid measuring pitcher, either stainless steel or borosilicate glass.

Place the head of the immersion blender in the jar and turn it on.  With the blender running, slowly pour the hot butter into the jar until all the butter is added.  Continue blending until it's thick and creamy.  

When it's hot, it will be pourable.  It will thicken as it cools. When it's cold it will be spreadable.

NOTE: adjust the amount of water, depending on your intended use.  Use 1 T. if you're going to consume all of it hot, use 4 T. for spreadable when cold, and use 2-3 T. for a texture that's thicker when warm but needs to come to room temperature to be spreadable.   

* You can use other herbs and seasonings!  I've made garlic hollandaise, lovage hollandaise, harissa hollandaise, and lemon hollandaise by using 2 T lemon juice and 3 T. water.  Use your imagination!


RECIPE: How to Clean and Prepare Senposai

It occurred to me that it might be helpful to document how I prepare senposai for cooking, to show how easy it is, much easier than any other green!

How to Clean and Prepare Senposai


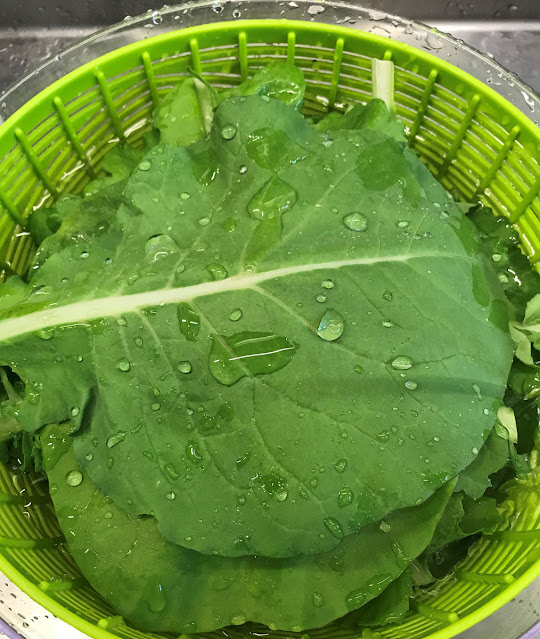
First, I rinse each leaf under running water, removing any dirt caught in the center rib.  The leaves are flat and easy to clean.

I stack the rinsed leaves in my salad spinner.  One full 'load' is the right amount for 4 servings.

If the leaves are really dirty, I will fill the spinner and give them a second rinse.  If they're clean, as they have been, I spin them dry.

Next, I remove the center rib.  For some recipes I reserve the ribs, for others they go on our compost pile. 

The plants are young now and the leaves fit easily in my spinner.  As the leaves get bigger, I remove the ribs before I spin the leaves, and I cut the leaves in quarters so they'll fit in the spinner.

Compare this process to cleaning curly kale for instance - I rarely cook curly kale because it's so hard to get the dirt out of the crevasses!  The only green that's almost as easy to clean as senposai is russian kale which is also flat and mostly crevasse free, except for the ruffles around the edges.


Most of my recipes call for chopped senposai.  

Once I've removed the ribs, I stack the leaves according to their size.  The smaller leaves I cut in half lengthwise and stack both halves.  Then, I slice them (this is much easier with a very sharp knife!) crosswise.


The larger leaves I quarter lengthwise, stack all four, and then slice them crosswise.  If the leaves are really big, cut them into 2" strips.


Once all the leaves are sliced crosswise, I chop the mound into roughly 1" pieces. 


If I'm going to use the ribs, I chop them coarsely.


Thursday, June 3, 2021

RECIPE: Creamy Senposai and Optional Chicken Stew

There is SENPOSAI in the farm store!!!  

I LOVE senposai!  Described as a "cross between cabbage and komatsuna (Japanese mustard spinach)", senposai, which translates as Thousand Wonder Vegetable, tastes more like sweet cabbage than mustard greens or spinach.  

It looks like a smaller version of collards, which makes it easy to wash and de-rib, but it cooks MUCH faster, in minutes as opposed to half an hour, and it's more toothsome than spinach or other salad greens.  I use it wherever I might otherwise use spinach or kale.  It freezes beautifully, both raw and blanched.


Here's a recipe I concocted for dinner tonight using as many farm-store vegetables as possible.  It's sort-of an UN-recipe because you can substitute most of the ingredients for something else.  It uses only one pan and it's ready in 10 minutes, once you've done all the prep.  I had dinner on the table in 30 minutes!

Creamy Senposai and Chicken Stew

Serves 4 

Ingredients

  •  4 T. bacon fat, lard, or ghee (I used ghee made from farm milk)
  • 1 c. chopped onions (I used green onions from the farm store, both the green and white parts)
  • 3 cups chopped senposai (I remove the ribs, slice thinly, then cut into 1" pieces)
  • 2 cups cooked chicken, cut or torn into small pieces OR 3 additional cups chopped senposai
  • 2 cups liquid - broth, milk, or water (I used chicken broth, made with farm chickens)
  • 3 T. flour (I used sweet rice flour)
  • 1 cup shredded cheese (I used gouda, but any melting cheese will work)
  • 1 t. Himalayan pink salt
  • 1/2 t. cayenne (optional, or you can use freshly ground black pepper)
  • 1/8 t. freshly grated nutmeg or 1/4 t. ground nutmeg
  • Chopped chives and chive blossoms for garnish (or sage blossoms).

Melt 1 T. fat over medium heat and saute the onions until translucent; 4 minutes for yellow onions, 1 minute for green onions.


Add the senposai and saute until wilted but still bright green, 1-2 minutes.  Remove to a bowl and reserve.


Melt the remaining 3 T. fat over medium heat and stir in the flour.  Whisk until medium brown, about 2 minutes.  Reduce heat to low and add the liquid, stirring vigorously with the whisk to prevent lumps.  Raise heat to medium and cook until thickened, about 3 minutes.


Stir in chicken and cheese, then stir until the cheese melts, about 1 minute.  Don't raise the heat or the cheese will separate.

Add the seasonings and stir to combine.


Add the reserved senposai and stir until heated through.  If it's too thick, add a little water.


Serve, garnished with chives and their blossoms.


You can serve this over toast (creamed chicken on toast), or with rice or pasta, but they're no longer part of our diet so we ate it neat/Paleo as stew.  We both went back for seconds!  If you replace the chicken with senposai, you can serve it as a side dish.


Here are some additional senposai recipes you can try:


Saturday, April 24, 2021

RECIPE: Roasted Frozen Broccoli with Optional Sauce

In the past, I made roasted broccoli with fresh broccoli, thinking frozen broccoli would be mushy.

How wrong I was!

Frozen broccoli cooks must faster, and it gets crispy on the edges about the same time the inside is cooked.  

Roasted Frozen Broccoli with Optional Sauce


Serves 2-4

Ingredients

  • 32-ounces of frozen broccoli (fits perfectly in a jelly roll pan.) 
  • 2 T. EVOO

Directions

Preheat the oven to 400F and move the rack to the center. 

Line a half-sheet pan with Silpat or parchment paper.

Pack the broccoli onto the lined pan and place it in the oven for 10-15 minutes as the oven is preheating.  This will defrost the broccoli so you can toss it with the oil. 

Jellyroll Pan of Frozen Broccoli, Defrosted
 

Remove the pan from the oven and drizzle the oil over the defrosted broccoli.  USING GLOVES (the pan will be hot!) toss the broccoli to distribute the oil.

When the oven has reached 400F, put the pan back in the oven and roast for 15 minutes or until the edges are starting to crisp.  Rotate the pan and roast another 5-7 minutes.

Remove from the oven, salt lightly, and serve.  

The two of us can easily finish a whole pan because we no longer eat rice, noodles, or potatoes.  If you serve it as a side, with two other dishes, 32 ounces would feed 4.

We eat it both plain, and with one or more of the sauces listed below the photo.

Roasted Broccoli with Tahini Sauce and Spicy Chicken Tenders


Optional Sauces

Notes:  You can also put the frozen broccoli onto the pan and let it defrost at room temperature.  It's easier to toss the broccoli with the oil once it's defrosted.


Friday, February 19, 2021

RECIPE: Carrot Salad with Tahini, Crisped Chickpeas, and Salted Pistachios

Believe it or not, I still have a few carrots left from last season's harvest - that's the beauty of Biodynamic Agriculture - and here's one of our favorite ways to serve them.

One of my favorite food bloggers is Deb Perelman of Smitten Kitchen.  Deb is funny, REAL, and she appreciates a well-seasoned recipe as much as I do.  I hack her recipes a lot!  Last week, she shared this recipe for carrot salad that sounded so yummy I couldn't wait to make it!  

The recipe comes together quickly - you can grate the carrots and mix the dressing while the chickpeas are roasting, and have dinner on the table in 30 minutes!  

It was so good my husband was mixing the leftover dressing and beans with the carrots that I slice as dippers!  As Deb says, "I don’t think I’ve ever had a bowl of grated carrots with so much complexity".

Original recipe: Carrot Salad With Tahini, Crisped Chickpeas, and Salted Pistachios

I copied her recipe below verbatim, and added my changes in red.

Carrot Salad with Tahini, Crisped Chickpeas, and Salted Pistachios

(Sorry for the crummy photo - I forgot to take one until I was almost finished eating!)
Serves 4

Chickpeas
1 3/4 cups cooked chickpeas, or 1 15-ounce can, drained and patted dry on paper towels
1 tablespoon olive oil
1/2 teaspoon coarse sea salt (I used 1 t. Himalayan pink salt)
1/4 teaspoon ground cumin

Salad
1 pound carrots, peeled and coarsely grated (We prefer a medium grate)
1/4 cup coarsely chopped parsley (I didn't have so I used cilantro)
1/4 cup shelled, salted pistachios, coarsely chopped

Dressing
1 medium garlic clove, minced (I grated mine into the lemon juice)
1/4 cup lemon juice
3 tablespoons well-stirred tahini
2 tablespoons water, plus more if needed
2 tablespoons olive oil
Salt and red pepper flakes to taste

Roast chickpeas: Heat oven to 425 degrees F. Toss chickpeas with one tablespoon olive oil, salt and cumin until they’re all coated. Spread them on a baking sheet or pan and roast them in the oven until they’re browned and crisp. This can take anywhere from 15 to 20 minutes, depending on the size and firmness of your chickpeas. Toss them occasionally to make sure they’re toasting evenly. Set aside until needed. (I spread mine into one layer and then left them there for 20 minutes.  I stirred them, spread them out again, and left them for another 10 until they were really crisp!)  NOTE: the last time I made this it was raining, and the chickpeas refused to get crisp!  I had to leave them in for 40 minutes, turning them occasionally. We then had to re-crisp the leftovers!


Make dressing: Whisk all ingredients together until smooth, adding more water if needed to thin the dressing slightly. Taste and adjust seasoning; don’t worry if it tastes a little sharp on the lemon, it will marry perfectly with the sweet grated carrots. (Yes!  Anything lemony is great with raw carrots!)

Assemble salad: Place grated carrots in large bowl and toss with parsley. Mix in 2/3 of the dressing, adding more if desired. Add more salt and pepper if needed. Sprinkle with a large handful of chickpeas (you’ll have extra and if you’re like us, won’t regret it) and pistachios and dig in. (You can see the medium grate of our carrots below, before I mixed them with the cilantro.)


Do ahead: Salad keeps well in the fridge for two days, however, I’d add the chickpeas and pistachios right before serving, so they don’t get soft.

Any leftover chickpeas make nice 'croutons' for a green salad.


RECIPE: Thai-Inspired GF Meatball Soup

The original recipe was written for chicken, but I didn't have ground chicken and I did have ground pork, so that's what I used and we scarfed this down!  It's naturally gluten free, I didn't have to make adjustments, but I did double the amount of spinach.

Original recipe: Thai-Inspired Chicken Meatball Soup

Thai-Inspired GF Meatball Soup


Serves 4 

  • 1 4-inch piece ginger, peeled
  • 6 garlic cloves, peeled
  • 1 jalapeno
  • 2 pounds ground chicken, turkey or pork
  • 1 large bunch cilantro, leaves and stems finely chopped, a few leaves left whole for garnish
  • 3 T. fish sauce, divided
  • 1 t. himalayan pink salt
  • 2 T. coconut oil
  • 2 c. chicken broth
  • 1 14-ounce can full-fat coconut milk
  • 1/2 t. granulated sugar
  • 10 ounces baby spinach
  • 1 T. lime juice, plus lime wedges for serving

Preheat the oven to 375F. 

Using the small holes of a box grater or microplane, grate the ginger, garlic and jalapeno (or finely chop them by hand). Transfer half to a large bowl and set the rest aside.  To the large bowl, add the meat, chopped cilantro, 2 T. fish sauce and 1 t. salt.  Use your hands to fully combine but do not overmix.

Form into 1-inch meatballs (I use a 25mm disher) and arrange them on a baking pan.  Bake for 20-25 minutes until bottoms are browned.

While the meatballs are cooking, heat 2 T. oil in a medium saucepan over medium heat.  Add the reserved ginger mixture and saute until fragrant, about 1 minute.  Add the chicken broth, coconut milk, sugar, and the remaining 1 T. fish sauce.  Bring to a simmer.

When the meatballs are cooked, transfer them to the broth and simmer 5-8 minutes to meld flavors.  

Remove from heat, add the spinach and lime juice, and stir until spinach is wilted. Garnish with cilantro.

Serve with lime wedges.   


RECIPE: GF Meatloaf with Caramelized Cabbage

I decided to make this recipe because the title sounded delicious - caramelized anything sounds delicious -  but, as I was pulling it together, and leaving out all the sweet ingredients because we don't like sweet with meat, I wondered whether it would be bland because there is NO seasoning.  Surprisingly, it was DELICIOUS!  We still can't figure out why, but easy and delicious is a winner in my book!

The original recipe is linked below, even though I left all the sweet ingredients out.

Original recipe: Kalpudding (Meatloaf with Caramelized Cabbage)

GF Meatloaf with Caramelized Cabbage


Serves 4-6

Ingredients

  • 2 T plus 1 t. unsalted butter, divided
  • 1 head green cabbage (1.5-2 pounds*) cored and shredded
  • 2 t himalayan pink salt
  • 1 pound ground beef
  • 1 pound ground pork
  • 1 large yellow onion, peeled and minced
  • 1.25 c. heavy cream  
  • 5 T chia seeds, preferably ground
  • 1/2 cup homemade low-salt chicken, beef, or vegetable stock, or water. 

Heat the oven to 350F.  I used our toaster oven.

In a large pan over medium-high heat, melt 2 T. butter.  When it starts to foam, add the cabbage, lower the heat to medium, and add the salt.  Cook slowly, stirring often, until all the liquid has evaporated and the cabbage is caramelized, approximately 20-25 minutes.

While the cabbage is cooking, add the chia to the cream and mix well.  Let it sit until the chia is hydrated, about 10 minutes.  Lightly stir in the meats, then add the onion and mix to combine.

When the cabbage is done, add about one third of it to the meat mixture and mix to combine.  

Use the remaining 1 t. butter to grease an 10" square baking pan (I used the 8 x 12 pan that fit in our toaster oven) and transfer the meat mixture to it, spreading it out to cover the whole surface evenly.  

Spread the remaining cabbage over the meat, pour the stock or water over the top, and place in the oven.  Cook for approximately 40-45 minutes or until the cabbage is very, very caramelized, almost dry and crunchy at the edges.  Allow to sit for 10 minutes before serving.

*I prefer a higher percentage of cabbage to meat, so I use 2 pounds of cabbage.  

*I have also made this with 1.5 pounds of canned (i.e cooked) ground beef, half a pound of raw ground pork, and 3 pounds of cabbage (a mix of chinese and savoy), and it was tender and tasty, but it didn't fit in my 8x12 pan so I made the extra into 1" meatballs and cooked them for 12 minutes.  Yum!!  I will definitely be making it that way again!  

*And, I have made it with 1.5 pounds of cooked ground beef and 1/2 pound of raw veal mixed with 1.5 pounds of cabbage (that was all I had on hand) and it was still good!  My husband - raving about it - had it for lunch and dinner, and he rarely eats the same meal twice in a row.  

*Well....Now I know what makes it taste so good!  I made it today with 1.5 pounds cooked beef and 1/2 pound of raw veal but replaced the cream with veal broth.  The first thing my husband said was, "Did you change something?  It's not as rich!"  I had to agree, it wasn't as good, even though I had increased the amount of butter to compensate for the fat in the cream.

So...it appears that you can play around with the meat types and proportions, but replace the cream at your risk!  I thought about using coconut cream, but felt it would compromise the flavor, as would nut milk.  If you use either one of those successfully, please let me know.


Wednesday, January 27, 2021

Recipe: Spicy Chicken Vegetable Soup Stew

Here's a recipe using winter farm produce that's unbelievably tasty without any spices!  I was astonished.  I know it doesn't look very good, but it was - we both had seconds.

The original used potatoes and corn, but we're eating low-carb these days so I substituted turnips (the large ones are sweet!) and used extra cabbage and extra peppers (we like spicy!). Next time I'll use more carrots.  In other words...the vegetable proportions are flexible - use what you like.

I had roasted peppers in the freezer from last season (learn how to roast them HERE).  I also had frozen green bell peppers, so all the vegetables in this recipe were from the farm.

Unbelievably, I had dinner on the table in just over one hour and it was delicious!  The hardest part was chopping all those vegetables....

Original recipe: Spicy Chicken Vegetable Soup

Spicy Chicken Vegetable Soup Stew 

serves 6-8

Ingredients

  • 2 Tbsp. olive oil
  • ½ large onion, chopped
  • ½ large bell pepper, chopped
  • 6 garlic cloves, minced
  • 2 large carrots, peeled and chopped
  • 1 large turnip, cut into ½” cubes
  • 7-8 cups chicken broth
  • 3/4 t. Chinese hot mustard powder or to taste 
  • 1 t. crushed dried oregano
  • himalayan salt to taste (I used 4 t.)
  • 6 small or 4 large roasted poblano chile or roasted NM green chile, chopped
  • 3 generous cups of chopped green cabbage
  • 4 cups leftover chicken meat, shredded
To serve
  • Monterey Jack cheese or medium sharp cheddar cheese, grated (a little for each serving)
  • Corn chips or fried tortilla strips
Instructions
 
In a soup pot, heat the olive oil. When hot, add the onion, pepper and garlic and saut̩ on medium low until onion is translucent, about 4 Р5 minutes.
 
Add the carrot and turnips and cook for 2 minutes.
 
Pour 7 cups of broth into the soup pot with the sautéed vegetables. Bring to a boil. Reduce to a simmer and simmer for 20 minutes.

Add the chicken, cabbage and roasted chile. If soup is too thick, add the last cup of broth to get the consistency you prefer. Bring to a boil and simmer for 10 minutes.

Remove from heat and taste for desired seasoning. Adjust if needed.

If you have time, let the soup cool then refrigerate for at least 4 hours or overnight. We all know that soup is better the next day. When ready to serve, reheat.

To serve, top each bowl of soup with a bit of cheese and some crumbled chips or fried tortilla strips.  ( I didn't do this and it was still delicious).


Tuesday, January 19, 2021

RECIPE: Spanish Spice-Crusted Pork Tenderloin Bites

Every now and then The Boston Globe prints a recipe that piques my interest.  Last month, their recipe for pork tenderloin sounded so delicious - and easy - I couldn't wait to make it!  It was indeed easy, the hardest part was waiting for the tenderloin to defrost!

Original recipe: Spanish Spice-Crusted Pork Tenderloin Bites (Pinchos Morunus)

Spanish Spice-Crusted Pork Tenderloin Bites


serves 3-4 depending on whether you serve a starch

  • 1-pound pork tenderloin, trimmed and cut into 1-1.5" slices
  • 1.5 t. ground coriander
  • 1.5 t. ground cumin
  • 1.5 t. smoked paprika
  • Himalayan pink salt and ground black pepper
  • 1 T. lemon juice plus lemon wedges for serving
  • 1 T. honey
  • 1 large garlic clove, finely grated
  • 2 T. EVOO
  • 1 T. chopped fresh oregano, or 1 t. dried (I used dried) 

In a medium bowl, combine the spices and 1 t. each of salt and pepper.  Mix well.  Add the pork and toss to coat evenly, massaging the spices into the meat until no dry rub remains.  Let sit at room temperature for at least 30 minutes and up to 1 hour.


Mix lemon juice, honey, and garlic.  If you're using dried oregano, add it here.  Set aside.


In a large skillet over high heat, add 1 T. oil and heat until just smoking.  Add the pork in one layer and cook without moving until deeply browned on one side, about 3 minutes.  Using tongs,  flip the pork and cook, turning occasionally, until cooked through and browned all over, another 2-3 minutes.

Remove from heat and pour the lemon-honey-garlic mixture over, then toss until evenly coated.  Transfer to a platter.

Sprinkle fresh oregano over and drizzle with the remaining 1 T. oil.  Serve with lemon wedges.

We served it with roasted broccoli - which was wonderful with the extra sauce.  It served 3 this way.


,

Sunday, January 10, 2021

RECIPE: Meatball-Croquettes made with cooked or leftover meat

For most of my life, I made meatballs with raw meat.

When I started pressure canning meat to free up room in the freezer, I started using 1 part canned (cooked) meat to 1 part raw, and the resulting meatballs were indistinguishable from those made with all raw meat.

Last week, when I forgot to defrost some raw meat to mix with the canned, I decided to see what would happen if I used all canned (i.e. cooked) meat and I'm happy to report that they were edible!  I was in a hurry and didn't want to bother with sauteing the onions so I used scallions and chopped them finely.  The whole thing, including baking, came together in 30 minutes!

They were different than meatballs made with raw meat - much more tender, to the point where my husband asked if they were cooked all the way.  I knew they were cooked, but to prove it I made another batch which I cooked for longer and they were dry and unappetizing.

I started with my gluten-free master recipe and just used all canned meat.  If you don't have canned, you can use leftover meat, finely chopped or ground.  I used canned ground beef but you can use any kind of meat - beef, veal, pork, lamb, chicken, or turkey.

Original recipe: Gluten free meatballs

Meatball-croquettes Made with Cooked/Leftover Meat 

Makes about thirty 1" meatballs

For each pound of cooked, chopped or ground meat:


Preheat oven to 350.

Beat the eggs and cream together, then stir in the chia meal (or potato flakes) and the salt.  Let this sit for at least 10 minutes to develop the panade (binder).

Meanwhile, mince the onions and measure out whatever seasonings you're using.

When the panade has thickened, stir in the onions and seasoning.  Add the meat and mix well.  Fry a small piece and correct seasoning.

Form into 1-1.5" meatballs (I use a size 60, 1.5" disher).

Place the meatballs close together on baking pan lined with Silpat, parchment, or parchment backed foil. .

Bake at 350 for 20-25 minutes.  Do not overcook or they'll be dry and tough!  

I served them on a bed of arugula with a dollop of sour cream.  Here's what the inside looks like:


 The leftovers were good cold, dipped into leftover bearnaise sauce....


Monday, January 4, 2021

RECIPE: Easy Bearnaise Sauce

Here's another alternative to mayonnaise, flavored with tarragon and shallots.

Bearnaise sauce is a variation on hollandaise, which is notoriously difficult to prepare, but this version is easy, foolproof, and fail-proof!  The technique is similar to the one I use to make mayonnaise.

I combined two recipes: Serious Eat's recipe for immersion blender hollandaise, and James Peterson's recipe for bearnaise.  The Serious Eats recipe made one cup, Peterson's made one quart.  I split the difference and made one pint.  

Original recipe: Foolproof Hollandaise in 2 Minutes

If you don't have an immersion blender, here is another foolproof way to make hollandaise  

For New Year's Eve dinner, we had beef chateaubriande with green beans and bearnaise.  The chateaubriande roasts at 375F for 20 minutes, and then rests for 10 minutes.  I made the shallot-herb extract while the beef was cooking, and made the bearnaise emulsion while it was resting.  

EASY Immersion Blender Bearnaise Sauce

Makes 2 cups (one pint)

INGREDIENTS

  • 3 medium shallots, minced
  • 2 t. dried tarragon (if you use fresh, use 1/4 cup of the leaves stripped from the stems)
  • 1 t. dried chervil
  • 1 t. cracked peppercorns
  • 3/4 c white wine
  • 3/4 c. white vinegar
  • 1 cup unsalted butter (2 sticks)
  • 3 egg yolks, from medium or large eggs
  • 3 t. cold water
  • 1/2 t. himalayan pink salt

INSTRUCTIONS

In a small saucepan over medium heat, combine shallots, tarragon, chervil, peppercorns, white wine and white vinegar.  Bring to a boil and simmer uncovered and stirring occasionally, until reduced to 1/2 cup, about 20 minutes. 

Strain through a fine mesh strainer into a small heat-proof pitcher. 

Wipe out saucepan and add butter.  Over medium heat, melt butter until foam subsides, about 5 minutes.

While the butter is melting, add the egg yolks, water and salt to a pint jar and get out your immersion blender.

When the foam has subsided on the butter, pour it into the pitcher with the shallot extract.

Insert the head of the immersion blender into the pint jar and turn it on.  With the motor running, slowly pour the hot butter mixture into the yolks.  The acid and heat will perfectly cook the yolks!

Taste and adjust seasoning.

Serve immediately.


Store any leftovers in the fridge.  

If you try and reheat bearnaise, the emulsion will break, but you CAN use it as a spread instead of mayonnaise. Here's what it looks like right out of the fridge - as you can see, it IS spreadable!


On New Year's Day, my husband rolled the leftover beans in some sliced ham, reheated them in the oven, and then spooned the cold bearnaise over top.  It melted slightly but didn't break, and he says it was delicious.


Sunday, January 3, 2021

RECIPE: Super Smooth Hummus with Multiple Seasoning Options

Ugh.  We've given up mayonnaise.  

Or, rather, we've greatly reduced our consumption, so we needed to find an alternative.  Hummus doesn't work as an alternative for ALL the places we use mayo, but it can be used on hard boiled eggs, as a dip for veggies, and thinned with water or EVOO as a salad dressing.  

There are several recipes on this site for hummus made withOUT chickpeas, so I thought I'd post a recipe for traditional hummus.  The best hummus I've ever had was made by our farmer's son, but I haven't tested that recipe yet so I can't post it.  His recipe is made with dried chickpeas, and I needed something faster, using canned chickpeas.

I've researched the cost of dried organic chickpeas vs Eden Foods canned chickpeas and the price is nearly the same so why not let someone else do the work?  This recipe uses the large 28oz can so I can split one batch into two and season both halves differently.  I will often double the recipe and make 4 flavors at once.

The recipe I started with (link below) recommends using freshly squeezed lemon juice, which would obviously be best.  When I don't have fresh lemons on hand I use bottled juice but I DON'T SHAKE THE BOTTLE BEFORE MEASURING.  The stuff on the bottom of the jar is what's harshly flavored.  

I also used half the amount of tahini she called for - the organic tahini I prefer is too expensive to use a whole jar for one recipe! Feel free to use more if you can afford to.

Hummus a wonderful dip for carrots, which are abundant in our farm store during the winter....

Original recipe: Best hummus recipe

Super Smooth Hummus with Multiple Seasoning Options


makes 4 cups

INGREDIENTS

  • 1 28oz can chickpeas
  • 1 t. baking soda 
  • 1/2 c. lemon juice
  • 2 large cloves garlic, chopped
  • 1 t. himalayan pink salt
  • 1/2 c. - 3/4 c. tahini (I used 1/2 cup, you can use more if you like)
  • 2-4 T. ice water
  • 1 t. ground cumin
  • 2 T. extra virgin olive oil
  • Za'atar, sumac, or paprika

SEASONING (one or more of the following):

  • 1/4 c. roasted red peppers
  • 1 T. harissa  plus 1 T. lemon juice
  • 5 t. berbere seasoning plus 2 T. lemon juice
  • 1/4 c. minced fresh jalapeno or 1 t. dried and ground
  • 1/4 c. sun dried tomatoes
  • 1/4 c. kalamata olives
  • 1/4 c. cilantro plus 1 T. lemon juice 
  • 1/4 c. roasted garlic

INSTRUCTIONS

In a medium saucepan, add the chickpeas (I don't drain them), enough water to cover them by 2-3 inches, and the baking soda.  Bring to a boil, reduce heat, and simmer for 10-20 minutes until they're easy to crush against the side of the pot.  Don't overcook them - when they start to fall apart they'll be impossible to drain! 

Drain them in a fine mesh strainer and then briefly rinse them under cold water.  Set aside to cool.

While the chickpeas are cooking, combine the lemon juice, garlic and salt in a food processor or high-powered blender.  Process until the garlic is finely minced and then let the mixture marinate for at least 10 minutes.   

While the chickpeas are cooling, add the tahini to the lemon juice mixture and blend until thick and creamy.  Scrape the sides as necessary.  

Drizzle in 2 T. ice water and process.  The mixture should turn several shades lighter.  You may need to add an additional 2 T. water if your tahini is very thick.  Scrape the sides as necessary.  I used 4 T. water.

Add the chickpeas and cumin and process until super smooth, 2-3 minutes, stopping occasionally to scrape the sides.  If you are NOT going to add additional seasoning, add the olive oil and process briefly - too much processing will damage the olive oil and make it bitter so you always want to add it last.

Taste and adjust seasoning - you may need additional salt or lemon juice.

Sprinkle with za'atar, sumac or paprika and serve!


If you are going to add additional seasoning, don't add the EVOO yet, you always want to add that last.

I divide the hummus into 2 batches and season each one differently.  Our favorites are harissa, berbere and roasted red pepper.  The photo above is harissa AND roasted red pepper!  Be creative...

Add your seasoning, process to blend, then taste and adjust salt and lemon.  

Add the olive oil last and process briefly - too much processing will damage the oil and make it bitter.