A few days ago I posted my recipe for
chicken bone broth; but, I must admit, I make and use veal bone broth much more than chicken. I'm posting my method even though there are hundreds of recipes online. According to
this recipe from The New York Times:
The difference between bone broth and regular broth, or stock, comes down to the length of the cooking time and the addition of acid to the cooking liquid. They taste very similar, though the bone broth has a slightly more intense flavor and a thicker, silkier texture. They can be used interchangeably in recipes. Really, the main difference is that many people consider bone broth to be therapeutic: the longer cooking time of a bone broth allows the collagen and minerals from the bones and connective tissue to dissolve into the liquid.
This website
explains that a stock is based on bones, and a broth (bouillon in
French) is based on meat. While a broth can be very flavorful, a stock
delivers a rich mouthfeel
courtesy of the gelatin that is slowly extracted from the bones.
This webpage lists 10 reasons why you should make your own broth.
Here is an EXCELLENT RESOURCE for all broth related questions, Please do read it!
I've been making bone broth for a looooong time - this is the consolidation of all the recipes and advice I've followed over the years with the important parts highlighted in bold. I apologize in advance for the length of this post but there was a lot of information I wanted to share.
The tastiest broth is made with meaty bones, but the bones are the healthy bits so if you don't have meaty parts, don't worry about it (or throw in a couple pounds of stew meat). Marrow bones are very healthy, if you can get them.
If you want the stock to have that unctuous gelatinous quality, you need knuckle bones. The gelatin and collagen in the joints are what create the luscious mouthfeel. You also mustn't cook it too long, or the gelatin will break down.
For a darker richer-looking stock, roast the bones first in a 400F oven for about 30 minutes until they're nicely browned. I have found that this darker stock changes the color of what I add it to which is sometimes a good thing and sometimes not. Often, I need a lighter stock that will just add flavor and not color, in risotto for instance.
Today I am making a light stock.
Easy Veal (or beef) Bone Broth, Stovetop
When I make stock, I normally use a 12 quart stock pot which yields about 2 gallons of stock. This pot easily holds 6 pounds of bones and plenty of veggies. If I luck into large quantities of bone and don't have room to freeze them, I will make an even bigger batch in a 16-quart or 24-quart pot.
In other words, the recipe can be scaled up or down.
Do NOT use an aluminum pot!
The aluminum will leach into the broth. I use stainless, you can use enamel (an enamel water bath canner would make a perfect stock pot!) or enameled cast iron. Some people use uncoated cast iron but I worry that the acid will leach too much iron into the stock.
INGREDIENTS
- 4-6 pounds of bones including knuckles and marrow (animals store heavy metals in their bones, so please use clean bones!)
- OPT: 2 pounds of stew meat (if your bones don't have much meat on them)
- 10 quarts (2.5 gallons) spring, filtered, or distilled water (you will be concentrating whatever contaminants are in your water, and heating aggregates fluoride and metals)
- 2 T. mild acid, helps extract minerals and collagen from the bones (I use fresh lemon juice, you can use apple cider vinegar, wine vinegar, or wine; regular vinegar will impart a strong flavor)
OPT - all the ingredients listed below are optional! They add flavor, but I will often make broth with just bones/meat so that the flavor of the broth doesn't interfere with what I'm using it in.
- 1 t. himalayan pink salt
- 6 large scrubbed but unpeeled carrots, cut into chunks
- 2 large unpeeled onions, cut into chunks*
- 2 leeks, white and green parts, cut into chunks**
- 1 bunch celery, including the heart, or 2 medium celeriac, cut into chunks***
- 3 heads garlic, unpeeled, halved through the center
- 1 bunch flat leaf parsley
- 1 small garnet yam or japanese sweet potato cut into chunks
- 6 allspice or juniper berries
- 2 bay leaves
- 6 strips kelp or kombu
- 1 c. medicinal mushrooms (turkey tail, chaga, reishi, etc...)
Put the the bones (and optional meat) into your stock pot and cover with 2" of water.
If you're using them, do not add the vegetables yet! Add acid and let the bones sit in the acidic water for one hour. NOTE: I've JUST read that
if you don't soak the bones in COLD water before turning on the heat, you need to cook them much longer to extract the mineralt! She claims that, "
If the bones are hot, the pores are closed, and the vinegar can’t get in to work its magic." (
This woman recommends 2 T. ACV for every quart of water but I have NEVER used that much, and no other recipe I've seen recommends that much, so take her advice with a grain of salt.)
After one hour, turn heat to high. Do not cover!
Monitor the pot until the water starts to steam and small bubbles make their way up from the bottom.
DO NOT LET IT BOIL! When you see small bubbles, turn the heat to low, cover the pot and let it simmer for at least 1 day, preferably 2. Yes, 2 days. (Most recipes instruct you to let it cook for at least 4 hours but I find the flavor is richer after a longer infusion.)
Check periodically to insure the water is not boiling - you want a gentle simmer.
The water should never boil.
Overheating the broth can cause the protein to break down and the broth to become cloudy. If your burner does not have an ultra-low setting and you need to keep the lid ajar to prevent boiling, if the water level drops below the bones, add more water.
Some recipes advise you to skim but I don't. Using bones from pastured animals there is very little 'scum' so I just strain very well at the end.
After at least 24 hours, add the vegetables and enough water to insure they're covered. Some people add vegetables willy-nilly but if you add too much of any one thing, the flavor will be unbalanced.
The reason you add these AFTER the bones have finished cooking is that the vegetables can become bitter if they're cooked too long. If you're only going to cook the bones for 24 hours, you can add the veggies at the beginning, but I usually cook my bones for much longer - sometimes 72 hours - so I add the veggies later.
Bring back to a simmer, cover, and leave overnight or up to 24 hours.
 |
Veggies added after bones have released their goodness.
You can see that it's not boiling, only simmering. |
Turn off the heat. Place a colander over a large bowl. Using tongs, remove as many of the bones as possible, placing them in the colander. They will have disintegrated so don't worry if you don't get them all. Discard the bones. Don't try and salvage the meat - it's given everything it had to the broth. (Our dog won't even eat it!)
 |
| Colander over a large bowl on left, large nutmilk bag over colander on right |
Using a large skimmer or ladle remove as many of the vegetables as possible, placing them in the colander. Ladle over as much broth as will fit in the bowl underneath. Let the vegetables drain and then discard them. (
Some people put these in their compost pile but they're covered with fat so I don't.)
Place another colander or strainer over a second large bowl and place a large
nut-milk bag, a piece of muslin, or 2 pieces of cheesecloth over the colander. Slowly pour or ladle the remaining vegetables and broth over the cheesecloth/muslin/nut-milk bag. If your bowl gets full, transfer it to another bowl or a clean stockpot and continue. (
NOTE: if you're making a small batch and you're tempted to put the bones in the nut-milk bag - don't! The sharp edges will tear the bag.)
 |
| All veggies out of broth on left, strained broth on right (gorgeous color!) |
Once you've emptied your stock pot, pour the broth collected in the first bowl through the nut-milk bag/muslin/cheesecloth. Gather up the ends and encourage the last of the broth to pass through. You will have difficulty with this since all the tiny holes will now be clogged with sediment. You don't want this sediment in your broth, so
don't force the liquid through.
If you wait too long to strain the stock, and the fat starts to congeal, it will be impossible to strain! You must strain it while it's hot!
You should now have at least 8 quarts of clean broth!
There are several things you can do with it at this point:
1. Transfer it to glass jars and either freeze or pressure can it.
2. Remove the fat and then proceed with option 1. To remove the fat you will need to let the stock cool in the fridge overnight and then scrape off the fat, which will have risen to the top and solidified. Save the fat and use it to fry potatoes.
3. Reduce the volume, which will intensify the flavor and require less room to store. When you use it, you can reconstitute it, if necessary, or use it as is.
I generally go with option 3 as follows:
Transfer all the broth to a clean stock pot, bring to a simmer and, leaving the lid OFF, let the liquid reduce by half. You can now proceed with option 1 or 2 above, or you can reduce it further and make your own demiglace or 'bouillon cubes'. If you're going to make demiglace, you must first remove the fat.
 |
Removing fat from reduced stock on left, defatted stock on right
(it's easier to remove the fat from a tall narrow container, than a wide bowl....) |
For demiglace, transfer the de-fatted broth to a smaller pot, bring to a simmer and, leaving the lid OFF, let the liquid reduce by half again. Transfer to a smaller pot and let it reduce by half a third time. You should now have 8 cups of a very concentrated chicken broth - demiglace.
At this point, you can transfer the demiglace to ice cube trays and freeze - each cube will reconstitute to approximately 1 cup of broth - or you can pressure can it.
I pressure can the first reduction in pint jars, and the demiglace in 1/2 c jars.
 |
Two layers of jars in my pressure canner
pints on the bottom, 1/2 cup on the top |
To reconstitute: 1 demiglace cube, or 1 tablespoon, in a mug with hot water and salt to taste.
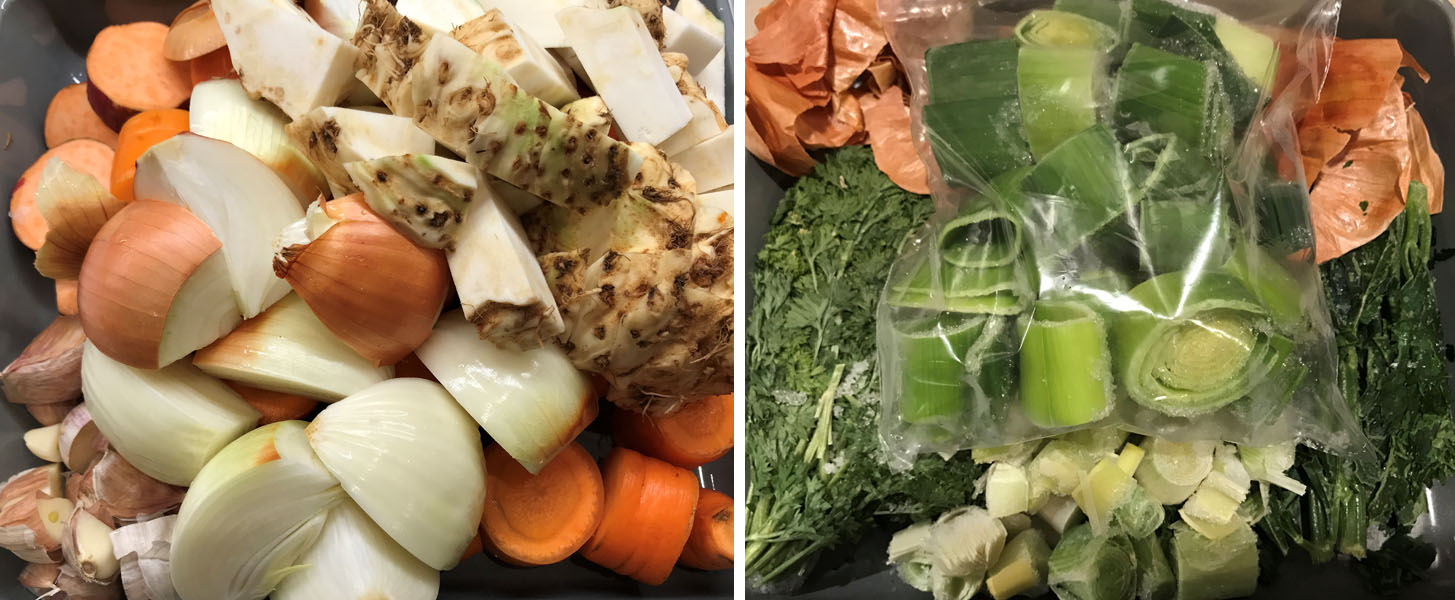
* Whenever I peel an onion, I save the outer layers (which are rich in quercetin) and the root end in a bag in the freezer.
** Whenever I use leeks, I save the dark green leaves in a bag in the freezer. In summer, when they're abundant, I will also cut up whole leeks and store them in the freezer.
*** Whenever I use celery, I save the outer stalks and the leaves in the freezer.
During the summer, I freeze bags of clean parsley to use in stock.
 |
| Fresh veggies on the left, frozen veggies on the right. |
Using the above mentioned
* tricks, I always have vegetables prepped and ready to use in the freezer whenever I decide to make stock.
A Note on Pressure Cooking Stock
Using a pressure cooker will greatly reduce the amount of time it takes to make stock. HOWEVER, a
study done by a SeriouseEats contributor rated the stovetop stock better than either pressure cooker or slow cooker:
"It’s been pretty consistent with every test I’ve done on this in the past: pressure cooker will get you to good results *faster*, but not necessarily absolutely better results. To my palate, the broths did taste slightly different: the pressure cooker version was a little sweeter, maybe due to more maillard reactions taking place in the higher heat, but I don’t necessarily think that’s a good or a bad thing, it’s just different."
If you're interested in this method, you should read the comments because they are enlightening. One commenter recommended cutting everything as small as possible, including the bones, to get better extraction. Another commenter referenced a study that claimed a modern pressure cooker made better broth than a jiggle-top pressure cooker. A third claims that only a pressure cooker can extract gelatin from BEEF bones, but it doesn't do much better than stovetop for chicken.
The main reason why I don't use a pressure cooker is that I haven't found a stainless one that's big enough. I prefer to make a large amount of broth, concentrate it, and then pressure can it. I will be researching pressure cooked beef bone broth, though, to see whether it improves gelatin extraction.