Sunday, December 15, 2019

RECIPE: Belgian Endive with Celeriac Puree, Walnuts, and Red Pepper

Belgian endive is one of my FAVORITE winter appetizers!  This recipe was adapted to use either celeriac or parsnips, both of which are available in our farm store over the winter.  Since I try and use farm products as much as possible, I also substituted roasted red peppers (which I store in the freezer) for fresh.  (There is no endive in the farm store at the moment so I will update the photo later with one of my own.)

Original Recipe: Endive, Cannellini and Walnut Appetizers

Belgian Endive with Celeriac, Walnuts, and Red Pepper
Makes 30


  • 2 c. celeriac puree (or parsnip puree)
  • 2 cloves garlic
  • 2 T. EVOO
  • 2 T. fresh lemon juice

  • 30 Belgian endive leaves
  • 1/4 c. walnuts, toasted and chopped
  • 1/4 c. roasted red bell pepper or sun dried tomatoes, chopped (or fresh, if you prefer)

Puree the celeriac, garlic, olive oil and lemon juice in a blender or food processor.

Refrigerate until ready to serve.

Spoon into endive leaves, top with walnuts and red pepper or sun dried tomato.


Sunday, November 3, 2019

RECIPE: Chicken Salad with Pear and Rosemary

The weather has just cooled down - highs in the 50's rather than the 70's - so I wanted to use fall seasoning in the chicken salad.  Noticing a pear on the counter that needed to be consumed I decided to use it, because I think chicken salad always tastes better with some kind of fruit...

Chicken Salad with Pear and Rosemary
Makes 3 cups

  • 2 cups leftover cooked chicken, shredded
  • 1/2 c. homemade mayonnaise (if you use purchased mayonnaise you may need more*)
  • 2 T. minced red onion
  • 2 T. minced celery
  • 1-2. seeded and minced jalapeno pepper
  • 1 pear, peeled and diced 1/4"
  • 1/4 t.. ground rosemary
  • himalayan pink salt to taste
  • OPT: 1/4 c toasted walnuts, chopped

Mix everything together, adjusting the jalapeno and salt to your taste. 


*My homemade mayonnaise is quite loose, not stiff like most purchased mayonnaise.  The one time I used avocado mayonnaise I needed more than I normally use.


Wednesday, September 11, 2019

RECIPE: Pork Coddled in Olive Oil

This recipe is from Paula Wolfert's WONDERFUL, The Slow Mediterranean Kitchen, one of my favorite cookbooks.  There are hundreds of recipes in this book that are as good as this one.  Unfortunately, Ms. Wolfert suffers from dementia, so please buy the book and support her!

When I need an impressive recipe that can be made ahead this is the one I use because it is so SO delicious!   I've made a few changes to the original that work better with the pastured pork we get from our farm.  If I'm able to get two pork shoulders, I double the recipe.

Original Recipe : Pork Coddled in Olive Oil

Pork Coddled in Olive Oil 
with Tuscan Beans and Arugula
Serves 4 

2 1/4 pounds pork shoulder or butt
1 T. coarse salt (I use 2 t. himalayan pink salt)
1 T. crushed black peppercorns
2 imported bay leaves, crushed to a powder, or 1/4 t. powdered bay leaves
1/2 t. bruised fennel seeds
2 sprigs thyme, or 1/4 t. dry
2 c. plus EVOO
1 small head garlic, halved
For Serving:
1 small red onion, sliced paper thin
2.5 t. red wine vinegar
Tuscan Beans (recipe follows) or one 29oz can cannellini beans
2 large bunches arugula

Trim away all fat, sinew, and membrane from the pork.  Cut the meat into 1-inch chunks.  In a large  bowl, toss the meat with the salt, peppercorns bay leaves, fennel and thyme.  Massage the seasonings into the pork, seal or cover tightly, and refrigerate for at least 6 hours or overnight.  (If I'm pressed for time, I will pack the pork into the pot I'll be cooking it in, and leave it at room temperature for an hour instead of refrigerating it overnight.)

Without draining the meat,squeeze the pieces into a medium ceramic or enameled cast-iron casserole in a single layer.  Pour on 2 cups of olive oil, making sure it gets under the pork.  Add the halved head of garlic (I separate the cloves and bury them among the meat).  Cover with a sheet of crumpled parchment paper and a lid and place in a cold oven.

Turn the oven to 275F (yes, 275F, this cooks on very low heat) and cook for 3 hours.  Check that the oil bubbles only a little, the meat should not brown.  To test if it's ready, scoop out one piece and tap it lightly; it should break into smaller chunks and be a soft pink color.  Remove from the oven and let stand until completely cool.

Raw on the left.................cooked on the right


Drain the pork into a colander set over a bowl.  Discard the garlic (I save it and use to flavor mayonnaise or salad dressing) and thyme.  Allow the juices to settle, then pour off the oil.  Add 3 T. of the flavored oil to the juices and store the juices separately.  Refrigerate for up to 5 days, making sure the pork is completely covered in oil, adding additional fresh if necessary.

Reheat the pork slowly, making sure it never boils!  I don't even let it come to a simmer.

At the same time, soak the red onion in the vinegar for 30 minutes.  In a large bowl, mix the beans with the reserved juices, the vinegar, and the red onions.

To serve, mound the arugula on a plate, spoon the beans on top, then scatter the pork over all.  Save any leftover oil - it's wonderful to dip bread into or as a base for salad dressing.

NOTE: Ms. Wolfert recommends mounding the beans on the platter, scattering the pork on top, and then sprinkling with the onions and arugula.  

Tuscan Beans

2 c. dried cannellini beans
2 garlic cloves peeled
1 dried hot red pepper
2 bay leaves
Himalayan pink salt
Freshly ground pepper

Soak the beans in cold water to cover by at least 2" for at least 12 hours or overnight.  Drain the beans.

Place the beans in a large pot and cover with 3 quarts of fresh cold water. Slowly bring to a boil, skimming once or twice.  Add the garlic, hot pepper, and bay leaves, and cook over lowest heat until tender, about 3 hours.

Drain the beans and discard the hot pepper and bay leaves.  Cool to room temperature and season with salt and pepper.  If beans are made ahead and refrigerated, return to room temperature before serving.


Saturday, August 17, 2019

RECIPE: North African Couscous

Couscous is traditionally steamed over the pot in which the meat and vegetables are cooking, and is more toothsome than the instant varieties generally available, but it's become nearly impossible to find.  I FINALLY found some TRADITIONAL, ORGANIC North African couscous at Chefshop!  (They also sell harissa, if you don't want to make your own.)

Rather than steam it in a couscousier, which is a real pain, I followed the recipe on the Chefshop website, purportedly from Joyce Goldstein, and it worked like a charm.  Her recipe uses 3 cups of couscous but I've dropped it down to 1 cup, which is easily scaled up.

How to cook North African Couscous Without Steaming 
Serves 2

1 cup North African couscous (NOT instant!)
1.5 cups water
1 t. EVOO
1/2 t. himalayan pink salt

Spread couscous in a flat bottom pan.  Bring the water to a boil and season with EVOO and salt.  Pour over couscous, cover with plastic wrap, and let it sit until absorbed 10-30 minutes.

Rake with a fork, or break up with your hands, and serve immediately.


RECIPE: Vegetarian Couscous with Seven Vegetables

This recipe, also from Paula Wolfert's book Couscous and Other Good Food from Morocco, is usually made with beef or lamb, but I needed it to be vegetarian so I eliminated the meat, doubled the vegetables, and added a few spices to compensate for the lost umami.  I found no meat-free couscous recipes in her book and had to improvise. 

I've made this several times now and use whatever vegetables I have on hand - radishes, green beans, butternut squash, etc....  The only veg you must have are garlic, tomatoes, onions, carrots and zucchini.

Vegetarian Couscous with Seven Vegetables
Serves 6-8
Ingredients:
  • 1/2c. butter or ghee
  • pinch pulverized saffron
  • 1/2 t. ground turmeric
  • 1/2 t. ground ginger
  • 1/2 t. ground coriander
  • 2 cinnamon sticks
  • small bundle fresh parsley and cilantro tied with a thread 
  • 4 t. salt
  • 4 cloves garlic, chopped, or 2 t. garlic powder
  • 4-5 ripe tomatoes, peeled, seeded and quartered (I used canned)
  • 4 medium yellow onions, quartered
  • 2 pounds carrots, peeled and sliced into 1.5" lengths
  • 2 pounds turnips or radishes, peeled and cut into 1.5" lengths
  • 2 pounds zucchini and/or summer squash washed and cut into 2" lengths
  • 1 pound pumpkin, butternut or potato, peeled, cut into 2" chunks, and steamed
  • 2-3 quarts water or vegetable stock
  • 1 fresh chili pepper
  • Handful of black raisins
  • 22oz can garbanzo beans, drained and rinsed* 

For serving: 
  • 3 cups couscous, cooked using the broth from the vegetables** (I use quinoa for our gluten-free friends)
  • 1 T. melted butter or ghee
  • 1 t. harissa 
  • 1 T. lemon juice
  • 1 T. EVOO
  • Pinch of cumin

In a large stock pot, melt the butter or ghee over medium heat and add the spices, herbs, garlic, onions, and tomatoes.  Cover and cook gently for 10 minutes.  Add 2 quarts water or vegetable stock.

(If you're using dry chickpeas, add the soaked and drained chickpeas here.  Add an additional 1 quart water, cover and simmer for 1 hour.)

Add the carrots and turnips.  Cover and simmer for 30 minutes.

Add the zucchini, fresh chili pepper, raisins and canned chickpeas.  Add another quart of water if necessary to keep the vegetables submerged.  Cover and simmer another 20 minutes.


To serve:

Dump the couscous onto a serving dish and toss with 1 T. butter or ghee.  Spread out and form a large well in the center.  With a perforated spoon, transfer the vegetables into the well.  Add the cooked pumpkin/potatoes.  Taste the broth for seasoning, adjust and strain.

Mix one cup of broth with harissa, 1 T. lemon juice, 1 T. EVOO, and a pinch of cumin.

Moisten the grain with the remaining broth.  Serve with Harissa Sauce.

* If you want to use dry chickpeas, soak 1 cup overnight in 4 c. water, then drain and cook for 1 hour in the tomato/onion broth before adding the carrots and turnips.

** Couscous is normally cooked in a colander OVER the simmering vegetables.  Because that requires special equipment, I prefer to cook the grains in a separate pot using the broth from the vegetables.  Once the vegetables are cooked, I skim off enough broth to cook the grains, and keep the vegetables warm while they cook.  In the photo below, they're shown over quinoa.

7-vegetables over quinoa "couscous"


RECIPE: Kuku Sabzi

There has been lots of chard in the farm store lately, so I Google'd for recipes and found this, which sounded delicious to me.  In reality, it was addicting!  I couldn't get enough of it. 

Once again, I combined two recipes, adding the chard from the first, and using the second for the seasoning and easier cooking method.  If you don't use chard, the second recipe is much easier overall.

Original recipes: Splendid Table and The Mediterranean Dish

Kuku Sabzi (Chard and Herb Fritata)
Serves: 4-6

  • 2 bunches green chard, washed, stems removed and chopped into 1/4" dice
  • 1 large leek, washed and sliced 1/4" thick  (I used green onions)
  • 7 T. butter, ghee, or Spanish or Greek EVOO
  • 2 cups finely chopped cilantro leaves and tender stems*
  • 1 cups finely chopped flat leaf parsley leaves and tender stems
  • 1 cups finely chopped dill leaves and tender stems
  • 6 large eggs
  • 1.5 t. baking powder (I didn't use this)
  • 1 t. himalayan pink salt
  • 3/4 t. grond green cardamom
  • 3/4 t. ground cinnamon
  • 1/2 t. ground cumin
  • 1/4 t. black pepper (I used cayenne)
  • 1/2 c. walnuts, toasted and chopped (optional)
  • 1/3 c. dried cranberries, coarsely chopped (optional)

Position an oven rack in the upper-middle position and heat to 375F.  Fit a piece of parchment paper into an 8" square or 9" round cake pan (original recipe calls for cutting the paper to fit the bottom of the pan, but my cake pans are aluminum and I didn't want the fritata touching the sides so I just folded and pressed the parchment to cover the sides as well.  I didn't coat the paper with EVOO and had no trouble removing it.  The second time I made this, I baked it in a ceramic baking dish with no parchment and had no trouble removing it). 

Saute the chard leaves in 1 T. fat until wilted.  Remove to a strainer.

Add another 3 T fat to the pan and saute the sliced leeks and chard stems over medium heat until tender and translucent.  Stir from time to time, add a splash of water if needed, or cover with a piece of parchment paper to entrap steam and prevent color from developing.

Meanwhile, squeeze the cooked chard leaves dry and discard the liquid.

In a food processor, combine the cooked chard leaves, parsley, cilantro and dill with the remaining 3 T. fat and process until finely ground. 

When the leeks and chard stems are cooked, add them to the greens.  Let everything cool a bit and then use your hands to mix everything evenly.  Taste and season generously knowing you're about to add a bunch of eggs to the mixture.

Recipe can be prepared ahead to this point.  Greens can be refrigerated for 3 days.

In a medium bowl, whisk the baking powder, cardamom, cinnamon, cumin and pepper.  Add 2 eggs and whisk until blended, then add the remaining eggs and whisk until just combined.  Fold into the herb mixture.   Add walnuts and cranberries if using.  Pour into prepared pan and smooth the top.

Bake in 375F preheated oven until the center is firm, about 20-25 minutes.

Let the kuku cool in the pan fro 10 minutes.  Invert the pan onto a plate and peel off the parchment.  Slice and serve warm or at room temperature with a dollop of yogurt or labneh (yogurt cheese).

* if you don't like cilantro, eliminate it and increase the other herbs by 1c. each.


Photo courtesy of The Mediterranean Dish


Thursday, August 15, 2019

RECIPE: Moroccan Kefta (Beef Meatballs)

The original recipe is from Paula Wolfert's book Couscous and Other Good Food from Morocco.  I used her seasoning mix but changed the procedure somewhat.  In Morocco, the meat is kneaded to produce a fine texture; I used the food processor.  You can make these without the breadcrumbs and eggs but they will not be as moist.

Moroccan Kefta (Beef Meatballs)
Makes sixty 1.5" meatballs

  • 2 pounds ground beef 
  • 1/2 c. fresh breadcrumbs (pulse bread in food processor until finely ground) 
  • 2 eggs
  • 1 medium onion
  • 1/2 c. coarsely chopped parsley leaves and small stems
  • 1/3 c. coarsely chopped fresh cilantro leaves and small stems
  • 1/2 t. dried Moroccan mint or 2 T. fresh mint
  • 1/4 t. dried marjoram or 2 t. fresh
  • 1 t. ground cumin
  • 1 t. ras el hanout
  • 2 t. himalayan pink salt

In the bowl of a food processor, process the onions and fresh herbs until both are finely minced.

Add the breadcrumbs, eggs and spices.  Puree.

Add the meat and pulse to combine and grind the meat a little finer.  Don't  overdo it - the meat shouldn't be mush!

Set aside for at least 1 hour to let the flavors ripen.

Preheat oven to 400 F and position rack in center.  Line a jell roll pan with parchment or Silpat.

Using a 1.5" disher, drop meat mixture onto the lined pan.  By placing them fairly close together I can get 60 meatballs onto one 12 x 17" pan (they're going to shrink, so they can almost touch).

Bake for 10 minutes.

Remove and let cool for a minute or two, then serve.  We like to dip them in Cilantro Jalapeno Sauce or harissa mayonnaise.


RECIPE: Muhammara Roasted Red Pepper & Walnut Spread

This unusual roasted-red-pepper-and-walnut concoction can be used as a dip, a sandwich spread, a pasta/pizza sauce, or a vegetable garnish!   I've wanted to make it for sooo long, and finally have all the required ingredients, like homemade pomegranate molasses and organic EV Spanish olive oil.

Original recipes (I combined them): Ottolenghi's Muhammara, Mediteranean Muhammara, Food52Muhammara

Muhammara Roasted Red Pepper and Walnut Dip 
Makes 4 cups

4 large red bell peppers, roasted, peeled and seeded (OR one 7oz jar roasted piquillo peppers )
1 c. breadcrumbs (pulse dry/toasted bread in food processor until fine crumbs form)
8 oz walnut halves, toasted (or almonds, or cashews, or a combination)
2 cloves garlic, pressed or grated (might be good w black garlic?)
1/2 c. pomegranate molasses
1 T. balsamic vinegar (or lemon juice)
1/4 c. tomato paste
2 t. himalayan pink salt
2 t. ground toasted cumin
2 t. smoked paprika
2 t. sumac
1/2 t. cayenne or Aleppo pepper
1 c. Spanish olive oil, divided

1. Add the breadcrumbs and walnuts to the bowl of a food processor or high-speed blender and pulse until the walnuts are finely chopped. 

2. Add 1/2 the olive oil and the remaining ingredients and process to a puree.  If it's too thick, add the remaining olive oil 2 T at a time.   The dip will be smoother if you use a high-speed blender.

3. Adjust seasoning and serve.

Ways to Use Muhammara (Pinterest)


Saturday, August 3, 2019

RECIPE: Chicken Fajitas

There were lots of peppers in the farm store today so, when I found two packages of chicken breasts in the freezer (while trying to make room for 1/2 a pig), I decided to make chicken fajitas knowing I had this delicious cilantro-jalapeno-sauce in the fridge to drizzle over them.  The sauce is spicy so the chicken has very little heat.  If you want more heat, leave the seeds and ribs in the jalapenos.  If you don't have banana peppers, leave them out. 

Fajitas are usually grilled, but that's a hassle, so I've found a way to make them on the cooktop.  The chipotle powder adds a bit of smoke flavor.

I buy our chicken breasts from Grassland Beef.

Chicken Fajitas
(The green blob in the center is purchased guacamole because I can't get avocados that ripen*)
Serves 4
  • 2 pounds chicken breasts, cleaned of gross bits
  • 1 large onion, peeled, quartered and sliced 1/4" thick 
  • 4 small or 2 large green bell peppers
  • 1 medium red bell pepper
  • 1 medium yellow bell pepper
  • 2 banana peppers
  • 2 jalapeno peppers
  • 4 T. lard, tallow, or ghee divided
  • 2 t. garlic powder
  • 2 t. ground coriander seed
  • 1 t. whole cumin seed
  • 1 t. MEXICAN oregano 
  • 1/2 t. chipotle powder
  • 2 t. himalayan pink salt
  • FOR SERVING:
  • warm tortillas
  • sour cream, stirred to loosen
  • cilantro-jalapeno sauce 
  • guacamole
  • fresh cilantro

Heat the tortillas (we use the toaster over) and keep them warm, wrapped in a dishtowel.

Core and de-seed all the peppers.  Quarter the bell peppers and slice 1/4" thick.  Halve the banana peppers and slice 1/8" thick.  Slice the jalapenos 1/16" thick.

In a large saute pan, melt 2 T fat over high heat and add the onions and peppers.  Stir to combine and then let them fry, stirring only once or twice until they're slightly charred and slightly softened; you don't want them limp.  The bottom of the pan will also be slightly charred.  Turn off the heat and let the onions and peppers sit in the charred pan while you prepare the chicken.

Mix all the seasoning together in a small bowl or custard cup and set aside.

Slice the chicken AGAINST THE GRAIN into 1/4" slices.

Push the onions and peppers to the side of the pan and turn the heat to medium.  Add the remaining 2 T fat to the middle of the pan.  When it's melted, add the chicken.   Sprinkle the seasoning mix over everything in the pan, the chicken and the onions and peppers.

Leaving the onions and peppers at the side of the pan, cook the chicken in the center, flipping and stirring, until it's barely cooked - don't overcook it or it will be tough!  You should see small areas of pink-ness.

Mix the onions and peppers into the chicken.  The chicken will finish cooking while you do this.  Reduce heat to low and keep warm while you serve it:

Place a warm tortilla on your plate, mound the fajitas on top, drizzle with sour cream,  cilantro-jalapeno sauce, and guacamole, and sprinkle with fresh coriander.


* Due to the drought in California, there is a shortage of avocados, so producers are picking them too early and they rot before they ripen!  I've started buying prepared guacamole even though it is inferior and not healthy (I cannot find organic).


Wednesday, July 31, 2019

RECIPE: Cilantro Jalapeno Sauce

Original recipe: Cilantro Jalapeno Sauce

Wow!  This sauce is delicious!  I drizzle it on everything!  I stumbled on the recipe a few weeks ago and just tested it.  The original recipe didn't work for me - there wasn't enough mayonnaise for the blender to do its job - so I doubled the amount and ended up with a delicious condiment!  I didn't want it overly spicy so I used 2 jalapenos (including the seeds) and two mild peppers.

Cilantro Jalapeno Sauce
Makes 2 cups

  • 2-3 ounces washed and dried cilantro including stems (about 4 cups loosely packed)
  • 4 small hot peppers (I used 2 jalapenos and 2 green cayenne)
  • 5 medium cloves garlic, peeled and chopped OR 2 t. garlic powder
  • 1 scant c. mayonnaise
  • 2 T. fresh lime juice
  • 2 T. avocado oil  OR 2 T. water for a thinner, pourable sauce
  • 1/2 t. salt

Slice the peppers 1/4" thick, removing the seeds and ribs if you don't want the sauce to be spicy.

Wash and spin dry the cilantro, then weigh it.

Load everything into a high-speed blender, in the order listed, and blend until smoothly pureed.

Adjust seasoning and serve.

NOTE:  Although this 'sauce' uses a lot of cilantro, and our homemade mayonnaise isn't stiff,  the sauce isn't drizzle-able and I suspect it's the avocado oil.  If you need a thinner sauce, use water instead or add a little water before serving.  The photo below is the sauce over some pasta salad.

Cilantro 'Sauce' over Pasta Salad
The photo below is the sauce diluted with a little water, then drizzled over bean barbacoa:


Tuesday, July 30, 2019

RECIPE: Cucumber Salad with Sesame Oil and Garlic

Here's another refreshing cucumber salad that my husband deemed, "just as good as the sweet-sour one but in a different way."  This one is smashed, rather than sliced, and seasoned with sesame oil and garlic.  I cut the recipe in half and used pickling cucumbers.

Original recipe: Smashed Cucumber Salad

Cucumber Salad with Sesame Oil and Garlic
Makes 2 cups

  • 3 large pickling cucumbers OR 1 english cucumber
  • 1 t. white sugar (I used biodynamic)
  • 1 t. himalayan pink salt
  • 1 clove garlic, finely crushed (would be better grated on a microplane)
  • 1 T. rice vinegar
  • 1 t. soy or 2 t. tamari sauce
  • 1 t. toasted sesame oil
  • red pepper flakes to taste (I used a pinch, it gets hotter as it sits)
  • 2 t. toasted sesame seeds

Wrap the cucumbers in a dish cloth, place on a cutting board, and pound with a flat object (I used my meat pounder) until they break.  Unwrap, transfer to cutting board, slice each one lengthwise, than in half lengthwise again.  Slice into 1" pieces.
Cucumbers smashed in dishcloth
Transfer to a strainer set over a bowl.  Mix with sugar and salt and leave to drain for 40-60 minutes.

Whisk together the garlic, vinegar, tamari, sesame oil, and red pepper flakes.  Transfer cucumber to a bowl and mix with the sauce.  Refrigerate for at least 30 minutes for flavors to mingle.  Sprinkle with toasted sesame and serve. 


Sunday, July 28, 2019

RECIPE: Hakurei Turnip Risotto with Arugula (or turnip greens)

In searching for a vegetarian risotto made without the umami of meat broth, I made this one (almost) exactly as written and was disappointed.  As the author says, the end result is very watery and needs the egg yolk to firm things up.  I didn't believe her - I've never made watery risotto - and I thought she must have done something wrong.

So... I made the recipe, except that I didn't add the miso until the end, reasoning that since it was 'raw' I didn't want to cook all the goodness away.  Up until that point, the risotto was perfect!  As soon as I stirred in the miso, the whole thing broke down into a watery mess!!!  There must be something in the miso that interferes with the starch in the rice.

I didn't want to use the egg yolk to thicken the mess, so I strained the rice out of the pan, reduced the liquid, and poured it over. The meal was salvaged but I wasn't going to make that recipe again!

Hakurei risotto without the beef

Fast forward two weeks I had some beef broth made from 4 ribeye bones and trimmings, plus the fat skimmed from that broth.  I still had turnips but no greens; however, I did have arugula and thought it would make a good substitute.  I also had some garlic scapes, since I had just processed them for the freezer, and I had some leftover sauteed onions.

When I went out to harvest some rosemary I discovered we didn't have any, but we did have tarragon.  Another substitution.  This is how I 'develop' a recipe....

Fortunately, the end result was so good my husband asked me to save the recipe!  I think it would be just as good without the ribeye meat but NOT without the broth.

Hakurei Turnip Risotto with Arugula
Serves 6-8

1/4 c. fat from ribeye broth OR ghee OR EVOO, divided
1 ribeye sliced thinly across the grain (as for stroganoff) (optional)
1 onions sliced 1/4" thick
1 c. garlic scapes sliced 3/4" (or 6 cloves garlic, sliced thinly)
500gms carnaroli rice (about 2 cups)
10 medium hakurei turnips, quartered and sliced 1/8" thick
8 c. beef broth* made from ribeye bones and trimmings
2-3 t. himalayan pink salt
2 t. fresh tarragon
2 t. garlic powder (omit if you used fresh garlic instead of scapes)
1 t. cayenne
3-4 c. arugula sliced 1/4" thick (or turnip greens)
1/2 c. cream or grated parmesan**

In a large saute pan, melt 2 T. fat over med-high.  Add ribeye and stir for 1-2 minutes until cooked medium-rare.  Remove to a bowl and set aside.

Add the onions and saute them until softened and lightly browned.  Remove to the bowl with the meat.

Add 2 T. fat to the pan, add the garlic scapes, and saute until lightly browned. (If you're using garlic instead of scapes, saute on medium-low so it doesn't burn).

Reduce heat to medium, add the rice to the pan and stir constantly until opaque, 3-4 minutes.

Raise heat to high!

Add 4 cups of the broth, 1/2 c at a time, stirring constantly after each addition and adding more when you can see the bottom of the pan as you stir.  Rice should now be half cooked.  Turn heat to low.

Add the salt, turnips, tarragon, garlic powder and cayenne.  Stir to combine.

Raise heat to high again!

Add the remaining 4 cups of the broth, 1/2 c at a time, stirring constantly after each addition and adding more when you can see the bottom of the pan as you stir.

The rice should now be cooked and surrounded with a creamy 'sauce'.  Turn heat to low and stir in the arugula.  Add the reserved beef, sauteed onions, and the cream/parmesan.  Stir to combine, adjust seasoning, and serve.

*The best risotto is made with beef broth, usually the broth from a pot roast.  This broth is almost clear and adds no color to the rice, unlike the veal demiglace I normally use which turns it light brown.  To make the broth, I covered the raw bones and trimmings with RO water, added a pinch of salt and 1 t. ACV, brought to a simmer (don't let it boil!), simmered on low for 24 hours and then strained. 

**I usually use cream instead of parmesan because cream is easier (no grating) and I can get healthy raw cream from our farm.  We think it tastes just as good.


Friday, July 26, 2019

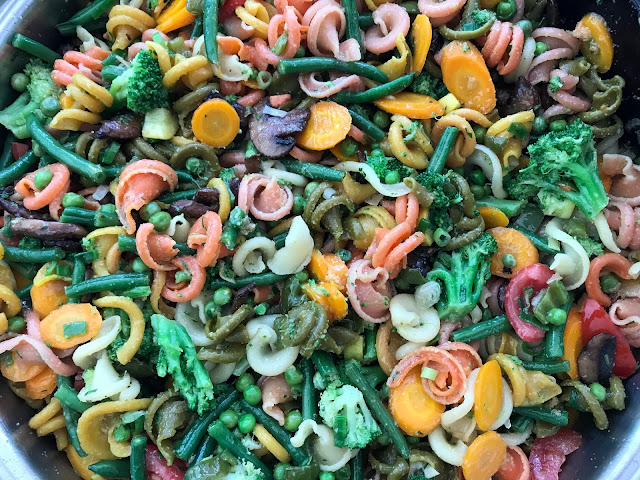
RECIPE: Veggie-Heavy Pasta Primavera

Pasta Primavera is "Springtime Pasta" made with spring vegetables.  Whenever I order Pasta Primavera in a restaurant, it's always light on the vegetables and heavy on the pasta!  This recipe is my attempt to overcome that using as many of the vegetables currently in our farm store, plus a few that aren't.  Additional veggies that would be awesome in this dish would be asparagus and artichoke hearts.

Veggie-Heavy Pasta Primavera
Serves 8-10

1 pound noodle-shape pasta (elbows, shells, penne, fussili, bowties, whatever...)
2 cups shelled peas
2 cups green beans cut into 1" pieces
2 cups carrot coins
2 cups broccoli florets
OPT: 2 t. red pepper flakes
2 cups sliced mushrooms
6 garlic cloves, sliced paper thin
4 green peppers, cut into 1/2" dice
2 cups small yellow summer squash/zucchini
4 large scallions, green parts sliced 1/2" thick, white parts sliced 1/4" thick
2 cups chopped tomatoes
2 T. chopped fresh herbs: parsley, basil, chives or a combination
1 c. EVOO, divided
salt

I decided that the easiest way to cook the vegetables and not have them overdone was to cook each one separately in boiling water until they were crisp-tender, and then combine them all at the end.  I then used the veggie-flavored water to cook the pasta.  The times noted are for farm-fresh vegetables.  Adjust them if your vegetables are frozen or from a grocery. 

Bring 6 quarts of salted water to boil in an 8-quart stock pot with a pasta insert.  Add the peas to the water and cook for 7 minutes or until almost soft.  Remove the pasta insert with the peas inside letting all the water drain back into the stock pot.  Set peas aside in a large bowl and return pasta insert to stock pot.

Repeat with green beans, cooking for 7 minutes, adding to the bowl with the peas.

Repeat with carrot coins, cooking for 5 minutes.

Repeat with yellow squash cooking for 3 minutes.

Repeat with broccoli cooking for 4 minutes.

Turn off heat under water.

In a large saute pan heat 2 T. EVOO over med-high and saute the mushrooms until lightly browned.  Remove but do NOT add to the bowl with the other vegetables.

Reduce heat to med, add 2 T. EVOO to the pan, and saute the garlic, green peppers, and the whites of the scallions until softened.  Add the mushrooms back into the pan, and the pepper flakes if you're using them, and keep warm over low heat.

Bring the water back to boil and cook the pasta until al dente (follow directions for timing on the package).  Add the reserved vegetables back into the water and cook until pasta is done and vegetables have been reheated - about 1 minute max!   Drain immediately reserving 1 c of the cooking water.

Add the pasta and vegetables to the saute pan with the garlic, peppers, and mushrooms.  Add the tomatoes, the scallion greens, the chopped herbs, and the rest of the EVOO and toss to combine.  If it's too dry, add some of the cooking water.

Adjust salt and serve.

NOTE: I used a tri-color pasta made with spinach, beets, and turmeric which adds to the colorfulness (and nutrition) of the dish.  Although there is only 1 pound of pasta, it makes a HUGE amount.  Fortunately, the leftovers can be eaten cold. (If you use gluten free pasta, it probably cannot be eaten cold, as we've found that the Tres-Omega pasta we use is very tough unless it's warm.)


Monday, July 22, 2019

RECIPE: Spicy Curried Egg Salad

I just made the BEST egg salad! Although our favorite mayonnaise flavor is harissa, our second favorite is curry so we often have a jar in the fridge.  In the past, I've used the curry sauce we serve with raclette, but it's a bit too runny so I made some adjustments for egg salad.

Spicy Curried Egg Salad
Makes 4 cups

  • 8 large-ish eggs, hard boiled and cooled (the eggs we buy aren't graded)
  • 1/2 c mayonnaise (see recipe notes below)
  • 2 t. curry powder (I've been using Pure Indian Foods organic)
  • 1 T. ghee
  • 1 t. Thai curry paste
  • 1/2 granny smith apple, peeled and minced
  • 1/2 small red onion, minced 
  • Opt: 1/4 c. minced jalapeno
  • Opt: 1 T. minced cilantro leaves
  • 1/2 t. salt

Make one recipe of homemade mayonnaise but use 1 cup of oil rather than 3/4.  This will yield a stiff mayonnaise that will stand up to the moisture the eggs exude.  (You can use regular mayo if you plan to eat it right away, but if it sits, moisture from the whites will make it too loose to use in a sandwich.  As you can see from the photo - I eat it in lettuce leaves.)

On medium heat, saute 2 t. curry powder in 1 T. ghee until fragrant - about 3 minutes.  Remove from heat and cool to room temperature (don't let it solidify!).  Stir into mayonnaise.  Stir curry paste into mayo.

Peel eggs and cut by hand into 1/4" pieces.  (I've found it's less messy to peel all the eggs, then chop all the eggs.) I make 4 lengthwise cuts on one side creating slices, then three lengthwise cuts on the other side to make batons, then as many cuts as needed across all these batons.  Yes, you can use an egg slicer but we prefer the slightly larger cubes created by hand. 

Mix eggs with everything except the mayonnaise.

Stir in enough mayonnaise to lightly coat.  I use about 1/2 c. 


RECIPE: Roasted Almonds

Normally, I soak our nuts (to neutralize the  phytates) and then dehydrate them to crisp them back up.  But, sometimes, I need roasted nuts in a hurry and don't have time for that 4 day process.  Here's how I roast them.

Roasted Almonds

1 pound raw almonds
10" x 15" jelly roll pan
stainless cooling rack to fit jelly roll pan
optional: salt

Preheat oven to 350F (325F ifyou're using convection)

Put the rack inside the pan and spread the almonds on the rack in a single layer.

Roast for 10-15 minutes.  (I went the full 15 minutes)  Because they're in a single layer, and raised up from the pan, you don't need to stir them!

Open the oven door to release the heat, and let the almonds cool inside the warm oven.

Transfer to a glass jar and store in a cool dark place.

OR...use them to make almond butter

Sunday, July 21, 2019

RECIPE: Arugula Almond Pesto

Original recipe: Arugula Pesto

I followed the original recipe almost exactly except for the part where she tells you to drizzle in the EVOO.  Olive oil can be damaged by the speed of the food processor blades so I poured it in quickly, scraped down the sides, and then pulsed it once to combine.

Arugula Almond Pesto
Makes 1.5 cups

  • 1 cup clean dry arugula leaves
  • 1/4 cup lightly toasted almonds* (I used a small fry pan to toast them), coarsely chopped
  • 1-3 large garlic cloves, chopped**
  • 3 T. fresh lemon juice
  • 1/4 cup freshly grated parmesan cheese
  • 1/2 c. EVOO
  • 1/2 t. himalayan pink salt

Combine everything except the EVOO in the bowl of a food processor or blender and pulse until almost smooth.  (It took some time to get the almonds to break down!).

With the motor running, pour the EVOO down the feed tube in about 3 seconds.  DON'T OVER-PROCESS or the blades will damage the EVOO and make it bitter!  If it's not creamy, scrape down the sides and then pulse once or twice.

Taste and adjust seasoning.  Use like basil pesto.

*You can also use walnuts
**If you want, you can toast two garlic cloves in their skin until blistered, then peel and mince.  If you don't toast two of the three, then only use 2 fresh cloves.


Saturday, July 20, 2019

RECIPE: Mushroom, Aduki and Onion Stroganoff

This recipe is from the cookbook, A Taste of Russia, by Darra Goldstein.  The original recipe calls for beef tenderloin but for vegetarians, I make this with mushrooms instead of beef and add 1/2 c. of aduki beans.

Mushroom, Aduki and Onion Stroganoff
Serves 4

  • 2 pounds mushrooms
  • 4 T. ghee
  • 1 large yellow onion
  • 2 t. mustard (dry or Dijon)
  • 1 c. onion broth
  • 1/2 c. sour cream
  • 1/2 cooked aduki beans, rinsed

Clean the mushrooms and slice 1/4" thick. 

Peel and halve the onion, slice 1/4" thick, and halve the slices.

In a large saute pan, melt 2 T. ghee over med-high and saute the onion until soft and barely golden. Remove to a bowl.

Melt the remaining 2 T ghee, add the mushrooms and saute until soft and lightly browned.  

Return the onions to the pan and add the onion broth.  Cook stirring until the broth is reduced to 1/2 cup.  Reduce heat to low.

Stir the mustard into the sour cream, then add the mixture to the pan with the mushrooms and onions.  Stir in the aduki beans. 

Raise the heat to medium and heat through but do not boil.  Season to taste.


The recipe directs you to serve stroganoff with french fries but we normally serve it with fettucini noodles.

RECIPE: Beef Ribeye and Onion Stroganoff

This recipe is from the cookbook, A Taste of Russia, by Darra Goldstein.  The original recipe calls for beef tenderloin but since that's rarely available in our farm store I've been using ribeye.  I've also eliminated the flour and replaced the beef bouillon with demiglace.  For vegetarians, I make this with mushrooms instead of beef .  I will also often add mushrooms to the beef version, although it's not authentic.

Beef Ribeye and Onion Stroganoff
Beef Stroganoff made with Red Onions
Serves 4

  • 2 ribeye steaks
  • 4 T. ghee
  • 2 large onions, yellow or red (I used red in the photos)
  • 2 t. mustard (dry or Dijon)
  • 1/2 c. veal or chicken demiglace
  • 1/2 c. sour cream


Remove the bones from the steaks and slice the meat AGAINST THE GRAIN into pieces 2" long by 1/8"  thick.  The slices need to be thin or they'll be tough.

Peel and halve the onion, slice 1/4" thick, and halve the slices.

In a large saute pan, melt 2 T. ghee over med-high and saute half the onion until soft and the edges are dark brown.  Add the rest of the onions and saute until barely golden. Remove to a bowl.

Sauteed red onions


Melt the remaining 2 T ghee.  

Add the meat and saute on high for just a few minutes until it's med-rare.  Reduce heat to low and return the onions to the pan.

Stir the mustard into the sour cream.  Add the demiglace, and then add the mixture to the pan with the meat.

Raise the heat to medium and heat through but do not boil.


The recipe directs you to serve this with french fries but we normally serve it with a vegetable - peas, broccoli, or roasted cabbage fettuccine noodles.


RECIPE: Zucchini with Basil, Mint, and Balsamic

This is another recipe I've been making for years.  I'm sharing it now because the farm store has both zucchini and basil.  Mint is long gone so I used dried.  Don't over cook the zucchini - they should be nicely browned but still hold their shape.  (I'll add a photo the next time I make this.)

Zucchini with Basil, Mint & Balsamic
Serves 4-6

  • 6-8 small zucchini, quartered lengthwise and sliced 1/2" thick
  • 1 T. fresh basil chiffonade (sliced into thin threads)
  • 2 t. dried Moroccan mint
  • 4 T. EVOO, divided
  • 2 T. balsamic
  • salt

Heat 2 T. EVOO in a large saute pan over med-high.  Add half the zucchini and saute, stirring occasionally, until nicely browned but not mushy.  Don't overcook them!  Remove to a bowl and repeat with the remaining 2 T. EVOO and the rest of the zucchini.  .

Return the first batch of sauteed zucchini to the pan, salt to taste* and add the herbs and balsamic.  Toss to combine and serve.

*Don't salt until after the zucchini is cooked or they will become mushy.


RECIPE: Sweet Hot Cucumber Salad

Years ago, I got this recipe out of a Thai cookbook, and it's very different from all the other ones I've seen on the internet.  This one has only 6 ingredients and comes together quickly.  It's one of our favorite ways to eat cucumber as it cuts through the rich saucy dishes we love. 


Sweet Hot Cucumber Salad
Makes 4 cups

  • 4-6 large pickling cucumbers OR 3-4 small cucumbers OR 1.5 english cucumbers
  • 1/4 c. thinly sliced red onion
  • 1 red chili pepper, thinly sliced (optional, I've made this without it)
  • 1 T. vinegar
  • 2 T. white sugar (use a little more if you use turbinado or biodynamic sugar)
  • 2 T. hot water
  • 1/4 t. salt

If you're using an english cucumber cut it into 3-4" pieces, if you're using small cucumbers cut them in half lengthwise.  Pickling cucumbers can be left whole and are my preferred variety for this because their seeds are so small.

Slice cucumber lengthwise into very thin strips using a vegetable peeler (or mandolin if you have one).  I don't use the top and bottom strip which are all skin.  Mix the slices with sliced onion and pepper in a medium size bowl.

slicing the cucumbers with a vegetable peeler


Mix sugar and water until sugar is dissolved.  Add salt and vinegar, taste that it's balanced, and pour over cucumber-onion-pepper mixture.

Toss occasionally until all the cucumber has softened, about 20 minutes.  You can see the progression in the photo at the top.   Chill until you're ready to serve it. 


RECIPE: Eggplant Dip with Fresh Herbs and Balsamic

I invented this dish when I needed an appetizer to accompany an "Italian" meal.

Eggplant Dip with Fresh Herbs and Balsamic
Makes 2 cups

2-3 Japanese (long skinny) eggplant* to yield 1.5 cups of flesh
2 T. roasted red peppers, chopped
2 cloves garlic, minced
1/2 t. minced fresh mint
1/2 t. minced fresh basil
1 t. minced fresh flat-leaf parsley
2 T. EVOO
1 T. balsamic vinegar
1 T. fresh lemon juice
1 T. capers, rinsed and chopped
1/2 t. salt

Preheat the oven to 350F.  Wash the eggplant and then roast (whole and unpeeled) until they are very soft and collapsed onto themselves, about 40-60 minutes. Cool to room temperature. 

Remove the stem end and puree the eggplants, skin** and all, in a food processor or blender.  You should have about 3 cups of flesh.

Add the remaining ingredients and pulse to blend - don't overprocess, you want them visible not pureed into oblivion.

Adjust seasoning and serve.


* I roast eggplant in the fall and then freeze to use all year.  I prefer to use Japanese eggplant because the skin is very soft and can be eaten.
** If you use globe eggplants, you will need to peel them after roasting. 

Thursday, July 4, 2019

RECIPE: Pasta with Turnip Greens & Garlic Scapes in Lemon Cream Sauce

This recipe was the happy result of trying to use whatever was in the farm store.  It's a variation on  Pasta with Swiss Chard but it's much easier!  It's not as pretty, since turnip greens don't have red stems, but it was ready in 30 minutes.

Pasta with Turnip greens & Garlic Scapes in Lemon Cream
Serves 4

2 T. ghee
20 garlic scapes
1 t. red pepper flakes or 1/2 t. cayenne (we like it hot! use less if you don't)
1 or 2 pounds turnip greens (depending how much 'green' you like in your pasta)
1 pound pasta of your choice
1 pint heavy cream
3 T. fresh lemon juice
salt
Optional garnish: chopped walnuts and/or cayenne

Bring a large pot of salted water to boil.

While you're waiting, chop the stalk ends off the turnip greens and then rinse the leaves in 2-3 changes of water.  Spin dry and slice into thin ribbons.

Cut the seed pods off the garlic scapes (reserve for another use), rinse the stalks and then slice into 1/2" pieces.

Melt the ghee in a large saute pan and cook the garlic scapes on medium-high until lightly browned.

Add the red pepper flakes and the turnip greens, reduce heat to medium, cover the pan, and cook stirring occasionally until wilted.

Add the pasta to the boiling water and cook according to package directions.

While the pasta is cooking, add cream to pan, raise heat to med-high, and simmer stirring often until slightly thickened, about 5-7 minutes.  The cream will bubble up a LOT so keep a close eye on it lest it boil over.  If it threatens to do so, remove from heat immediately and stir vigorously!  If the cream is reduced too much, it will become oily - stir in some water to return it to creaminess.

Stir in the lemon juice, reduce heat to low, and keep warm until the pasta is done.

Reserve 1/2 cup of the pasta cooking water.  Drain the pasta and combine it with the sauce.  I put the pasta into the saute pan with the sauce but you may need to pour the sauce into the pasta pot.  Use  the reserved pasta water if necessary to create a creamy sauce.  

Stir to combine, adjust seasoning, and serve.  I like to sprinkle with chopped walnuts.


RECIPE: Beef Chili with Garlic Scapes

This is essentially my Beef Chili with Hidden Nutrition recipe but I used garlic scapes instead of garlic.  I cut the scapes big enough to be noticeable because once they're cooked they have a pleasing toothsomeness, similar to celery.  You can see the chunks in the photo below.

Beef Chili with Garlic Scapes
Serves 6-8


3 pounds ground beef* (I used home-canned beef)
1 T. ghee, lard, or coconut oil
2 medium onions, diced (about 2 cups)
20 garlic scapes (about 1 cup diced)
1 cup carrot pulp or 2 cups grated carrots (or 1 t. Dr. Cowan's carrot powder)
1 18oz jar tomato passata
4 T. ground chile ancho
2 T. ground cumin
2 t. ground coriander
2 t. mexican oregano, crushed by rubbing it between your palms
3 t. himalayan salt
1 t. Dr. Cowan's biodynamic 3-beet powder
1 t. Dr. Cowan's spinach powder
2 t. Dr. Cowan's low oxalate greens powder
1 t. Dr. Cowan's wild ramp powder
Opt: 1 t. Dr. Cowan's winter squash powder

Garnish: sour cream, grated cheese, chopped onions, cilantro, avocado or guacamole, corn chips


Cut the seed pods from the garlic scapes (remove for another use), rinse the stalks and then slice them into 3/8" pieces.

Heat the fat on medium-high and saute the onions and garlic scapes until they're translucent, about 5 minutes.


*If you use raw ground beef, add it here and cook until it's no longer pink.

Turn the heat to low (to prevent splattering) and add the tomato passata, then add all the spices and powders.  Stir to combine.

Add the beef, bring to a boil, then reduce heat to med-low and cook until the flavors meld and most of the liquid has evaporated, about 1 hour.  (*If you used raw ground beef, cook until it's tender which could take 2-3 additional hours depending on the meat.)

Serve with sour cream, chopped onions, grated cheese, cilantro, and/or chopped avocado.  My husband also likes to crumble corn chips on top.


RECIPE: Vegetarian 'Refried' Beans with Garlic Scapes

There are masses of garlic scapes in the farm store!  Here's my latest way of using them to replace garlic.  I serve these alongside chili for those who like beans (I make our chili without beans).

These are 'refried' in the sense that they're sauteed after being simmered.  Most people think of refried beans as mashed, but we prefer them whole.  If you prefer them pureed, crush them with a potato masher or the back of a spoon as you add them to the pan with the onions.  You may need to add a little water for better consistency.

If you're not vegetarian, using lard, bacon grease, or chorizo drippings will make these even better!

"Re-fried" Beans with Garlic Scapes

Serves: 3 as a meal, 6 as a side


2 T. ghee
1 large onion, minced
10 garlic scapes, seed pod removed, stalks washed and sliced 1/8" thick
1 T. ground cumin
1 t. ground coriander
1 t. basil, crumbled between your palms
1 t. salt
29 oz can Black Beans (Eden Foods is the only brand I know without BPA in the can)
15 oz can Pinto Beans (Eden Foods is the only brand I know without BPA in the can)
For serving:
Cilantro
Queso or grated cheddar
Seeds inside the garlic scape seed pods

In a medium saute pan, melt ghee over medium heat and saute onions and garlic scapes, stirring occasionally, until starting to turn brown.  Reduce heat to low, cover, and cook until very soft.

Meanwhile, drain beans, rinse thoroughly, then drain again.

Add the beans and the spices to the pan, stir, and simmer on low heat until warmed through.  

Serve sprinkled with cilantro, grated cheese, and the garlic seeds from inside the pods.

(If you don't have garlic scapes, use 3 cloves minced garlic instead.)


Sunday, June 2, 2019

RECIPE: Fettuccine Alfredo with Chive Blossoms

Chive blossom season is a short one, so I use them every chance I get during the few weeks they're available.  The blossoms taste just like chives, only milder.  If you'd like to learn more about them, click HERE, and HERE, and HERE

Fettuccine Alfredo with Chive Blossoms
Serves 4

1 T. ghee
2 cloves garlic, minced, or 1 t. dried
1.5 cups heavy cream
2 egg yolks
1 pound fettuccine (I used tagliatelle)
1 cup freshly grated Parmigiano cheese
2 T. chopped chives (plus 1 T more for garnish)
2 T. fresh chive blossoms (plus 1 T. more for garnish)
salt and pepper

Whisk the egg yolks into the cream.  Set aside.

Bring 6 quarts of water to a rolling boil over high heat.

Add the fettuccine and 2 T. salt to the water and return to a boil.  Reduce heat to medium-high (water should continue to boil, but not vigorously) and stir pasta frequently to prevent sticking.  Cook for 10 minutes.  When you cut a strand in half, there should be no white in the center.  Don't overcook it, though, you want to drain it as soon as the last sliver of white disappears.  Any longer than that and it will be mushy.

While the pasta is cooking, in a small sauce pan heat the ghee on medium and saute the garlic until fragrant.  Pour in the cream mixture, reduce the heat to low, and stir frequently to insure the mixture doesn't get too hot, or the eggs will cook and the sauce will be ruined.   You just need to heat the sauce slightly.

When the pasta is cooked, remove 2 cups of the cooking water and set aside.  Drain the pasta and return it to the pot you cooked it in.  Add 1/2 cup of the reserved cooking water.

Pour in the warm cream mixture, stir to combine with the pasta, then add the grated cheese.  Stir until the cheese melts and creates an unctuous sauce.

If the pasta absorbs too much of the sauce add some more of the reserved cooking water.  (If too much moisture leaves the cream, the sauce will become oily; adding moisture back in will restore the creaminess.)

Stir in the chopped chives and the chive blossoms.  If you like, garnish each serving with additional chives and blossoms.

I didn't think it needed any additional salt or pepper.


RECIPE: Chive Blossoms!

Our chives are starting to blossom!  Did you know that the blossoms are edible?

They taste like chives, but milder. 

And they make a beautiful lavender-colored garnish.


I've never seen chive blossoms in a grocery store, but the chives in our farm store now include the buds, and the chive buds in our garden have started to open.  I cut the flower stalks off at the soil line to prevent the plant from going to seed which encourages the plant to continue producing leaves. 

Their season is short, so take advantage of them NOW!  
Here's how to get the most out of them:

IF THE BUDS ARE OPEN when you bring them in, you will need to wash them - tiny bugs DO hide inside the florets.  Plunge them into water and swish them around several times.  Dry thoroughly.  

IF THE BUDS ARE STILL CLOSED you can keep them from opening by storing them in the fridge, wrapped in moist paper towels.  They will stay unopened for a week or two.  There won't be bugs inside the closed buds so you don't need to wash them before using unless there is dirt on the outside of the buds.

If you WANT THE BUDS TO OPEN, put them into a glass of tepid water and leave them on the counter.  They'll open in a day or two.


ONCE THE BUDS ARE OPEN, you need to use the flowers quickly or they will ferment.  I have kept them packed into a Weck jar for a week, tops.


To 'harvest' the florets, grasp the base of the flower in one hand, grasp the florets between your thumb and forefinger of the other hand, and pull gently.  Some of them will still have the tiny stem attached, but that's OK, the tiny stem is edible.  The stalk and the papery membrane covering the bud are not palatable.


Use them anywhere you would use chives: 

Sprinkle them over salad, soup, scrambled eggs, mashed potatoes, or sauteed vegetables.  

Stir them into softened butter, then freeze in ice cube trays to use later.

Stir them into softened cream cheese or sour cream.

Stir into risotto, or Alfredo sauce for pasta.

Stir them into deviled egg filling.

Preserve them in vinegar.


Pictured below is an asparagus soup with chive blossom garnish served at a local restaurant.

Asparagus cream soup with chive blossom garnish


Here are some of my favorite recipes:

Chive blossom Alfredo sauce for pasta
Pesto and Chive Blossom Aioli
Chive blossom mayonnaise
Almond and chive blossom pesto
Chive blossom vinegar (if you use ACV, it will not have that gorgeous lavender color)